When any task in life gets repeated often we can fall into the trap of procrastination and just leave it until tomorrow, then the next day and so on. Procrastination on an aquarium especially saltwater can be fatal for your livestock!
To help fend off procrastination we need to make the work on our aquarium as easy as possible, as quickly as possible and if able, get something to do it for us! This is where this Top 12 list comes in of the best gadgets I’ve found over my time.
After owning most of them I can tell you that I would never own an aquarium without them!
12 Best Aquarium Gadgets For Making Life Easier!:
- Magnetic Clips To Replace Suction Cups
- Flood Alarm
- Magnetic Algae Scrapers
- Refractometer
- WiFi Camera
- Automatic Feeder
- Hanna Checker Colorimeters
- Dosing Pumps
- Flood Guardian
- Automatic Top-Off System
- Roller Mat
- Aquarium Controller
I placed these in order from cheapest to most expensive as I want to share with you why these have been game-changers in their own task, for not only my sanity but allowing me freedom from my aquarium and ultimately more time with my family!
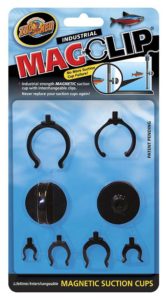
#1 Magnetic Clips
Equipment suction cups have been the thorn in the side of aquarists for decades because they work great for a while, then the suction cup material hardens and ‘Poof’, off they pop!
You may have experienced this yourself when you come home and your aquarium is cloudy because your powerhead suction cups let go and now your sandbed is being blown all over your aquarium!
Yep, it’s happened to us all! It makes your heart skip a beat when you first see your pristine aquarium now looking like a scene from a Sahara Sandstorm!
The MagClip from Zoo Med allows you to now secure that heater, airline, tube, sensor or powerhead (with some easy modification) so that they never move!
Just find a clip that closely matches the equipment and secure it in place.
To secure a powerhead bracket you can buy Nylon bolts that you can screw or superglue into the magnet.
Things To Be Aware Of
- Each pack contains only 1 magnet! Fixing a heater will require 2 packs for example
- They are generic sized clips so they may not fit snugly to your equipment being held.
- They can become brittle so don’t go bending the clips – Heat with a hairdryer or similar beforehand
- Like all magnets, keep an eye on them over time to ensure their coating does not break down
- Magnets may not be strong enough on thick-walled aquariums.
Where To Find Them
You can find them and their reviews Here at Amazon.com
Beginners Tip:
If the clip size is not big enough for the heater or equipment you are trying to secure use this tip:
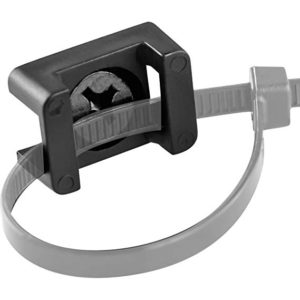
You can find the Zip-Tie Bases Here at Amazon.com
and…
Zip-Ties Here at Amazon.com too.
Secure these plastic Zip-Tie bases to the magnet using Nylon bolts and Superglue (If Required).
This will allow you to secure any sized piece of gear.
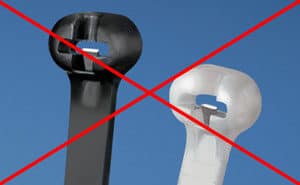
Just be sure to get the Zip-Ties that contain no metal clips inside.
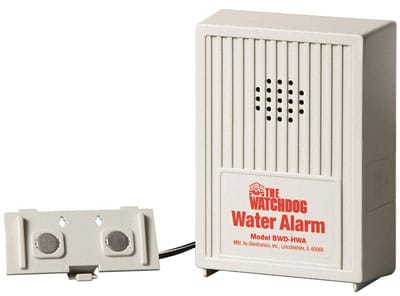
#2 Flood Alarm
One of these $12 items saved a client’s house when a manufacturing defect in a hose led to said hose splitting and pouring water into the home. Without this simple device, the restoration cost would have been immense!
Every aquarium owner should have one of these behind their aquarium, behind their sump and even behind their washing machine! Just treat them like your smoke alarms and test them once in a while and replace the batteries every few years and you are good to go!
This simple device uses two metal contacts to detect the presence of water. Once detected they sound a very loud alarm that runs until the device is removed from the water.
One cool detail about these is the bottom plate the contacts are on can be removed and placed remotely by the means of a connecting wire. This allows you to get the sensor under an item like a washing machine etc.
Things To Be Aware Of
- You have to ensure the batteries are replaced for it to work
- You have to be home to hear it
- It will not isolate the water supply
- It will not send a message to your phone/computer
- Metal sensor cannot be placed in your aquarium water
Where To Find Them
You can find them and their Reviews Here at Amazon.com
Beginners Tip:
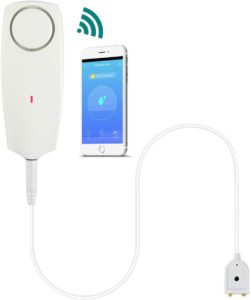
The alarm above is what is known as a ‘Passive Sensor’. It sits and monitors. But if you want to create an Active System that can detct, notify and then act, you can upgrade to these items:
Upgrading to a Wireless sensor allows you to be notified anytime it detects a water leak at the remote sensor.
This system will sound a 60db alarm and notify you via its Smartphone App.
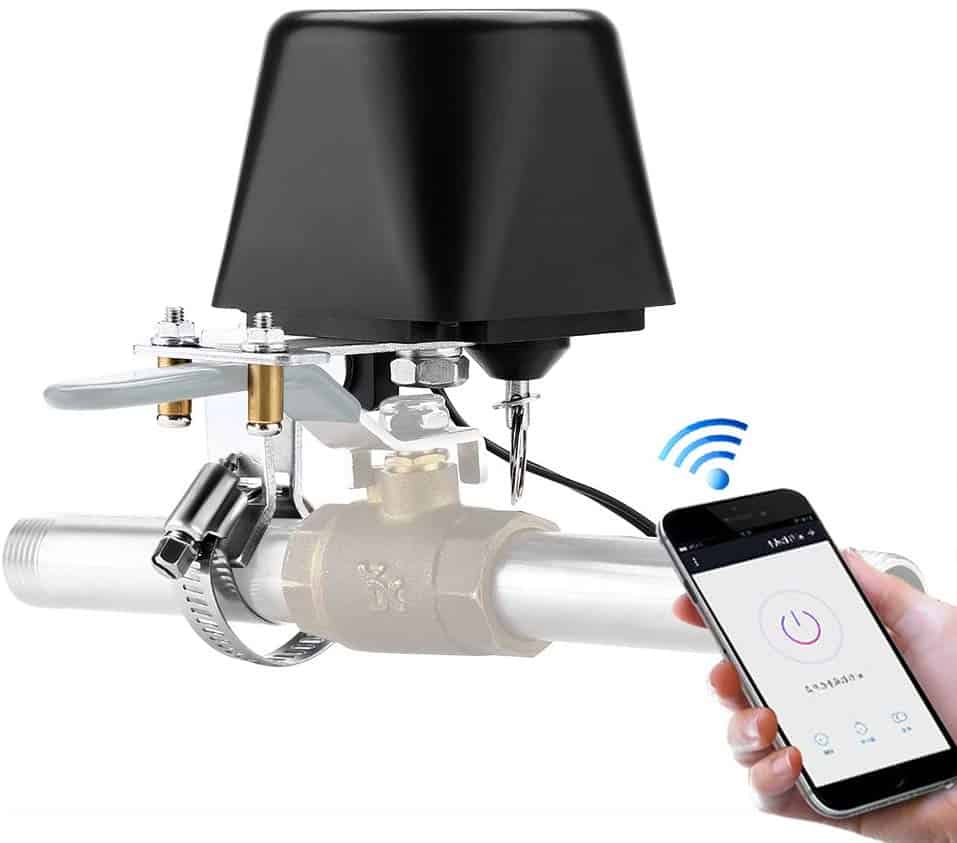
To go one step further you can install an Automated Valve Closing Device.
What happens if you are not home when you get the alarm!? The water is still going to pour out, but this device changes that.
By easily installing this device over your house water shutoff valve you can easily tell the valve to close from your smartphone – Shutting off the water!
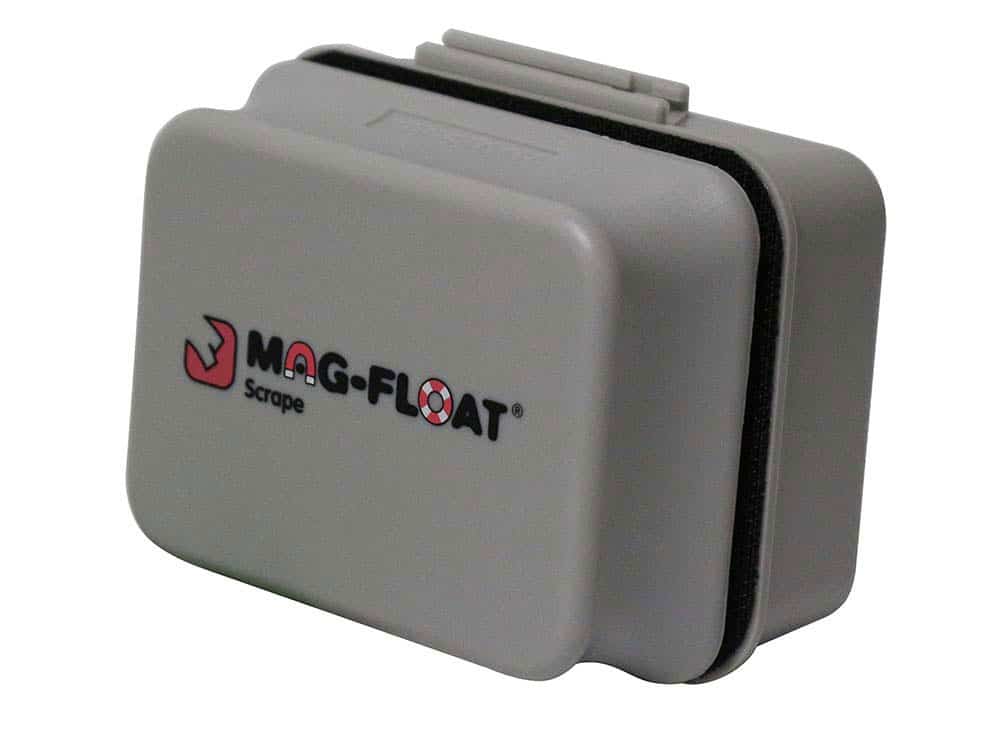
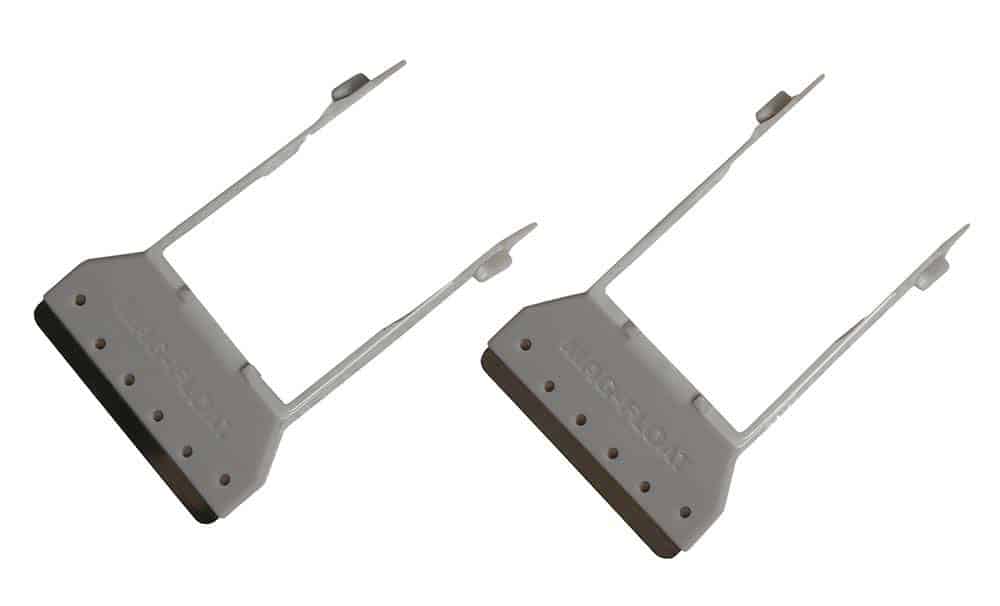
#3 Magnetic Algae Scrapers
Your aquarium is going to get green and on a daily basis. How green it gets depends on many factors for another article, but to keep your tank sparkling you need to clean your glass regularly.
When you have a device like a magnetic algae scraper it takes only minutes to completely clean every glass panel. Without one you are getting out the brush, getting your hands wet, then spilling and splashing water everywhere!
Once you purchase a magnetic algae scraper you will have wondered why you waited so long!
Having this gadget will allow you to clean your glass every day if needed in the same amount of time it takes to boil the kettle!
Things To Be Aware Of
- The magnets can be very strong and if you pinch your skin by getting the two halves close together you will curse!
- Keep the algae scraper away from your sand bed. It will pick up grains of sand that can scratch your glass
- Inspect the rough and felt surfaces before each use to check for single grains of sand
- Get an algae scraper that floats – Makes life so much easier 😉
- When creating your aquascape ensure you leave enough room for your algae scraper to pass by each rock
- If you have an Acrylic aquarium, be sure to get a scraper for Acrylic – Glass ones WILL scratch your tank!
Where To Find Them
You can find a Great Selection Here at Amazon.com
Beginners Tip:
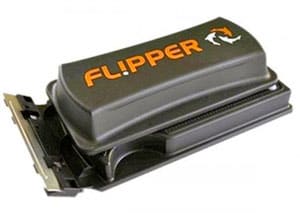
There is a really easy way to supercharge the power of your scraper that sends the algae flying off in sheets – A Razor Blade!
Be very cautious with the blades near the silicone seams of your tank!
Use a toothbrush or algae brush to get the seams once a week. The blades also allow you to scrape right down to your sand while keeping the scrubbing pad far away from the grains.
By purchasing an Add-On blade attachment or getting a scraper with an integrated stainless-steel blade your algae scraping time has just halved again!
The first time I tried a blade I was blown away and I’ve used one ever since! It scrapes the algae off in sheets and your fish – Tangs especially, go nuts!
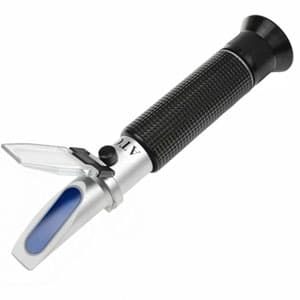
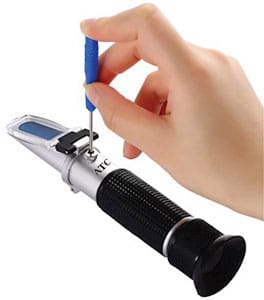
#4 Refractometer
Accurate testing of your water parameters is paramount to not only allow you to keep your water at the optimum levels, but also very important to track any changes or trends that may be happening over time.
Measuring the salt content or salinity as its commonly referred to is something that you should be doing regularly – Every few days. As the water in your aquarium evaporates it leaves the salt behind making your water ‘Saltier’ if left unattended.
Making new water will require you to test the new batch before you put it into your aquarium. You will literally be testing your salinity all the time. One of the quickest and most affordable ways to get an accurate result is by using a Refractometer.
This inexpensive, easy-to-use, easy to calibrate device is one of the first purchases you should make for your reef tank.
A few drops of aquarium water dropped onto the screen, then a look through the eyepiece will instantly tell you exactly what your salinity is.
It literally takes you seconds to do! These are far better than the Swing-Arm or Bobbing Hydrometers that can be horribly inaccurate.
Things To Be Aware Of
- The eyepiece can be turned to focus it for easy reading
- Clean and dry the testing prism plate after each use
- If hard to read, point it directly at a light bulb and read again
- If dropped it may need recalibrating
- Calibrate it every month to remain accurate
Where To Find Them
You can find them Here at Amazon.com
Beginners Tip:
I mentioned keeping them calibrated often to maintain their accuracy. I calibrate mine every month and it is super easy to do.
A quick turn of the calibration screw to adjust the reading to 35ppt or 1.026 is all it takes to calibrate this device!
Simple, easy and quick!
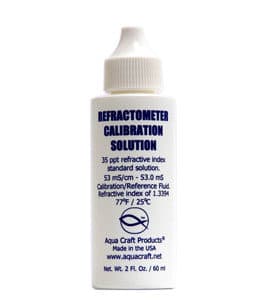
When purchasing your Refractometer also pick up a bottle of Refractometer Calibration Fluid.
Just a couple of drops placed onto the Refractometers Prism Plate and it will give you a reading. If your Refractometer does not show 35ppt or 1.026 then it needs calibrating.
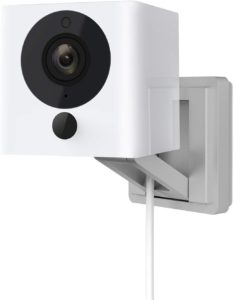
#5 Wifi Camera
If you want peace of mind when you are away on vacation or a business trip then a simple wifi camera will be one of the best $50 you will ever spend on your aquarium.
I found this use by accident when I fitted a baby camera to monitor our son when he was first born. Leading up to our first trip away I thought about moving the camera to watch the aquarium while I was away. For the first time, I could relax while away from home!
Since that trip, I fitted two permanently, one to view my aquarium and one to view my sump.
You can pick these up for under $30 bucks and they are super easy to setup. Most come with a smartphone app and a web browser so you can log in at any time and see what’s going on.
Many of them have night vision to allow you to see the tank at night and also sound so you can hear if everything is running as it should.
Things To Be Aware Of
- Mount your camera so that you can only view the aquarium and not the whole room – Privacy
- Ensure you follow the setup instructions & create your own usernames and passwords
- Some cameras can be remotely moved and rotated
- These are for external aquarium use only – They are not waterproof
- Do not leave these to live stream your feed all day at work – You could end up with a Data Overage Charge on your Internet Bill!
Where To Find Them
From $19.99
Click Here for a Good Selection, Information & Reviews at Amazon.com
Beginners Tip
If you purchase multiple cameras from the same manufacturer you are able to link them all into one app and view them all in real-time.
Not only can you just watch your aquarium, but you could also monitor the inside and outside of your home, your pond, your doorstep, anything! A whole-home security system for under $100!
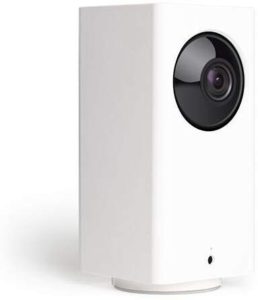
I’m really liking the Wyze Lab range of Wifi cameras and if I were to buy new cameras these are what I would get.
They come in a range of models with a ton of features including Alexa & Google integration, add-on sensors, motion alerts and many, many more!
To see the Wyze Lab range with tens of thousands of reviews, more information and pricing
Click Here to go to Amazon.com
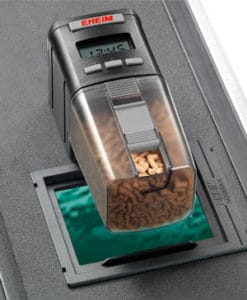
#6 Automatic Feeder
This device is one of the first gadgets that allows you to go on vacation without having someone come and feed your fish! The automatic fish feeder is a really simple piece of equipment that dispenses a set amount of food whenever you wish.
Not only are automatic fish feeders useful just for when you go on vacation but many aquarists set them up permanently to dispense small amounts of food throughout the day. This is especially helpful when you have high calorie burning fish like Anthias that need regular meals.
The great thing about automatic fish feeders is the flexibility they give you.
They can dispense different size foods, they can dispense once or multiple times a day, they can be a standalone unit or be coupled to an aquarium controller, some even have 2 chambers to dispense different foods at the same time.
Things to Be Aware Of
- When not using the feeder remove the batteries before packing it away
- Always use new batteries when going on a multiple week trip to ensure it doesn’t fail early
- Setup your auto feeder a week before you leave to ensure it works as expected
- Set it up to feed a little less than you would by hand – Prevents overfeeding
- Prevent it from getting splashed as food can then stick and not dispense properly
Where To Find Them
You can find a Great Selection with Information, Reviews, and Prices
Here at Amazon.com
Beginners Tip:
Setting up the dispensing amount from your automatic feeder can take several attempts to get it right. Dispensing this food into your aquarium every time is a sure-fire way to overfeed the aquarium and set the water up for problems while you are gone.
The best way I have found to do this, and the way I have done it for years is this:
- Set yourself up at the kitchen table/counter to make this easy to work at.
- Get a small bowl and take a regular pinch of food that you would normally feed and drop it into the bowl – This is your Control Amount.
- Take another bowl and set the auto feeder to dispense once into this second bowl.
- You are trying to match the amount dispensed to the control amount in the first bowl.
- Pour the dispensed food back into the food container, readjust the gate on the auto feeder and dispense again.
- Repeat this process until the dispensed amount matches or is just slightly less than the control amount.
- Once they match your auto feeder is ready to have your dispensed times set.
- Fill the food hopper to about 80% so the food has room to tumble during rotation and not get stuck.
- Ensure enough food is in the hopper for the duration of your trip.
- Position the auto feeder over the aquarium in an area where it won’t get splashed
- Monitor feeding and operation for a few days before your departure.
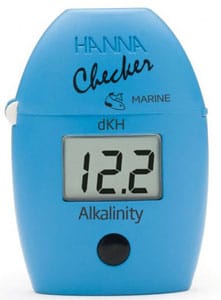
#7 Hanna Checker Colorimeters
Regular testing of your aquarium water is a fundamental part of this hobby. Not only does this tell you the quality of your water but when tracked, it allows you to spot rising and falling trends to which you can react to and fix.
To some aquarists, testing can be a real chore, and getting the right test kit for you is paramount to ensure your testing regime does not slip. I have used the Salifert range of test kits for years and they are super easy to use, but there is one problem that many people can face – Eyesight.
For those of you that have trouble comparing the sample to the scale or are colorblind, the regular test kits can be really problematic.
This is where the Hanna Checker series works great! A simple, easy-to-read digital number tells you exactly what the value of your water parameter is – No more guessing.
Things To Be Aware Of
- They have a higher upfront cost, then ongoing reagent costs
- They need to be calibrated often
- Some of the powder sachets need careful handling to prevent spillage
- Alkalinity and Phosphate Checkers are the most popular for coral owners
Where To Find Them
You can find them Here at Amazon.com
Beginners Tip
When you reach the point of starting to keep corals, and especially LPS and SPS, Phosphate is a parameter you will want to keep a close eye on as it can really prevent your corals from growing if it’s not correct.
When keeping fish your phosphate should be <0.2ppm
When keeping soft corals and LPS it should be <0.05ppm
When keeping SPS corals it should be <0.03ppm
Phosphate can be a difficult parameter to accurately measure with a test kit but luckily Hanna has come to the rescue once again.
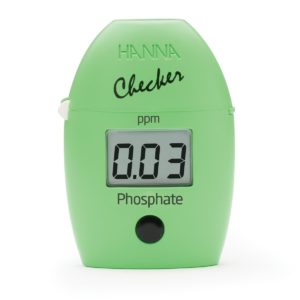
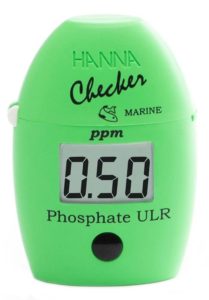
There are two checkers from Hanna that you want to use.
The Phosphate checker will detect the higher levels of phosphate from 0 – 2.50ppm. This is generally used in Fish Only aquariums.
The Phosphate ULR Checker is the one as coral keepers we need. This checker tests the lower end range from 0 to 0.90ppm.
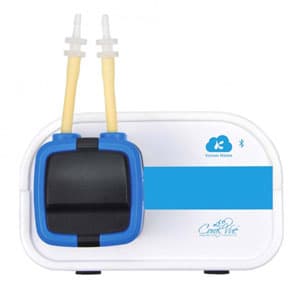
#8 Dosing Pumps
When your corals’ demand for Calcium, Alkalinity, and Magnesium outgrow the rate at which they can be replaced with regular water changes, it is time to begin supplemental dosing of these elements.
Daily dosing can soon become a chore and it can also prevent you from leaving your aquarium for a vacation, for example. This is where automated dosing pumps come to your rescue.
Automated dosing pumps can come as a single head unit or multiple head units to fit your particular needs.
They can be simple pumps that you connect to a plug-in wall timer for control, have onboard electronic control or be connected to an aquarium controller.
No matter what, these devices will give you greater freedom from your aquarium and are very accurate at helping to maintain rock-solid water parameters.
Things To Be Aware Of
- Dosers can range from $60 up to $600, so pick accordingly
- Do your research into the quality & reliability of the doser you intend to purchase
- Dosers still require weekly water testing
- They will dose exactly what you tell them too – Wrong Data = Wrong Dosage
- Keep an eye on the quantities in your fluid reservoirs
- Mount dosers above outlets of dosing pipes to prevent siphons
Where To Find Them
Click Here to see a Good Selection, More Information, Reviews & Prices
Here at Amazon.com
Beginners Tip
Dosers are one of those devices that you tend to set and forget and that almost bit me in the ass when I first began to use them! The pumping parts of the dosers need regular maintenance to ensure accuracy!
Here are some things to check regularly:
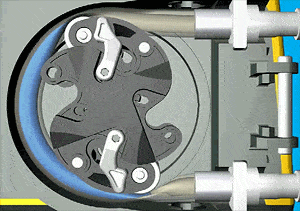
- Check the soft pipe that the rollers squeeze on. They have a limited life and can split – If it sucks in air, it will not dose accurately
- Clean the rollers and pipes every month
- Every week grab a sample when it doses to ensure its the correct amount
- Every month calibrate each dose pump to ensure accuracy
- Every month clean the outlets of the dosing pipes to ensure they remain free of crusty deposits
#9 Flood Guardian
When making water for your aquarium’s water change I can bet that you have either flooded your home, you know someone who has, or it could be in your near future if you have not taken measures to prevent it.
Almost every month on social media or the forums I see someone who forgot to turn off their RO/DI unit and it overflowed their bin/container and flooded the floor. For some, they catch it early and it’s not too much clean up, but others have left it overnight and woken up to a swimming pool in their home!
This is where the Flood Guardian from XP Aqua comes in! It is nicknamed the Marriage Saver for a reason! For $69.99 it is a no brainer!
Things To Be Aware Of
- This is Not an Automatic Top-off System – See next gadget
- Direct sunlight on the sensor can affect its operation
- Microbubbles on the sensor can affect its operation
- Too thick a mounting surface can cause the sensor to ‘Pop Off’
- Pay attention to the Direction Of Flow arrow on the solenoid valve
Where To Find It
See all the Reviews, Information and Questions
Here at Amazon.com
Beginners Tip
If you are unable to afford a Flood Guardian just yet here are some tips that you can use to help prevent a flood:
- Install a float valve into the side of your collection bin/container to help shut off the water when it reaches the valve.
- Instead of using one large bin, use two smaller buckets and place them in the shower stall or bathtub. Two smaller containers are easier to lift and carry than a large Brute trashcan.
- Buy a Flood Alarm mentioned in Gadget #2 to alert you.
- Set a timer on your phone to remind you.
- Place sticky notes on your pillow or back of the door to remind you before you go to bed or leave the house.
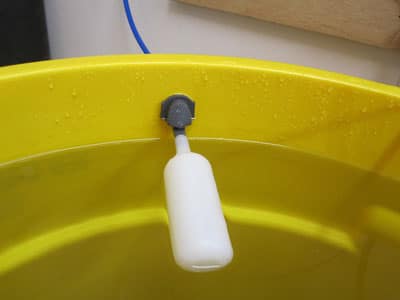
#10 Automatic Top-Off System
Every aquarium is going to evaporate water. When the water is around 80°F it is going to happen, how much your tank evaporates can depend on other factors like surface agitation, other tanks connected to a system like coral frag tanks and a sump, how much heat is given off by equipment etc.
As the water evaporates especially in a saltwater aquarium it leaves behind the salt and if that water is not replenished your water will become ‘Saltier’. Left unattended it will kill your livestock. To combat this we need to replace this water lost to evaporation with Fresh Water on a daily basis. Just like the dosing pumps, doing it manually can become a chore!
One of the first upgrades many aquarists will purchase is an ATO – Automatic Top-Off System.
There are many systems available for every size of aquarium. Some are simple and some are advanced. There is one for every budget!
This completely automatic system will sense a drop in the water and activate a pump to replenish that lost water.
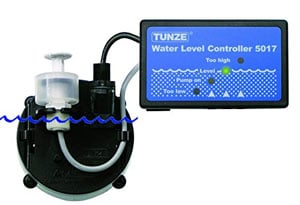
Things To Be Aware Of
- This system will pump water from a reservoir into your aquarium
- You need to keep the reservoir topped up
- The bigger the reservoir, the less it needs filling
- You ONLY put fresh water in the reservoir
- Follow the manufacturers’ instructions to prevent siphons
- Buy a quality, reputable and well-reviewed ATO system
Where To Find Them
Click Here for a Vast Selection, Information, Reviews & Prices
Here at Amazon.com
Beginners Tip:
Some ATO systems will have a timer component to them to prevent the ATO pump from running too long. This helps prevent a stuck or incorrect reading from the sensor allowing the pump to continue running forever.
If too much Fresh Water was added into your aquarium it would drop the salinity of the water and possibly kill your livestock.
It is important to set this timer correctly by following the manufacturers’ directions when you first install your ATO.
#11 Roller Mats
Roller Mats or Fleece Rollers are a fairly new technology to really offload one of the most laborious tasks in reefing – Cleaning your mechanical filter floss or socks every few days.
The job of the mechanical filtration is to remove detritus, uneaten food and fish excrement from the water. If this captured waste is then left to sit in an unchanged filter, in the water, it will break down and negate the purpose of the filter.
These roller mats are a great way to automate the task of regular floss/sock replacement!
They may take a little planning before you buy your aquarium on which one to buy to fit your type of system, but if you can install one I know you will not regret it.
With so much praise from across the community, my next build will definitely be incorporating a Roller Mat to give me even more time to enjoy the tank rather than working on it!
Things To Be Aware Of
- Most of the roller mats at this time will only fit sumped aquariums
- Unless you are lucky, most sumps will require some planning or DIY to fit one
- They are definitely a ‘Want’ item and not a ‘Need’ item
- Depending on your bioload, a roll could last 6-8 weeks before replacement
- Check the roll replacement cost before buying a roller mat system
Where To Find Them
See Here At Amazon.com for More Information
Beginners Tip:
Sorry Guys & Gals, I have to be honest but I’ve got nothing for this one! Being a fairly new product and not having owned one I have not been able to craft a great tip for you!
If you are a tinkerer or DIY minded then these would be easy to build your own, and I think how that’s how I will do mine. There are a few videos out there of DIY roller mats.
The other thing I would be looking into is a simple device to unroll and pressure clean a used roll and reuse it. Some kind of manual rollers with a pump and spraybar, pressure washing the fleece with water could work well.
Time to get out my son’s Lego Technic and start playing!
To Be Continued…
#12 Aquarium Controller
By far one of the most important and best investments you can make in your aquarium! Once you have begun to spend over $500-$1000 on setting up your aquarium then it is time to look at putting a controller on your Christmas Wish List.
A controller may seem extravagant to many but I can tell you I will never own an aquarium without one.
I was lucky enough to have the electronics background to build my own but what they can do for you is phenomenal!
The list of functions even the basic controllers can do is far too long to list in this article, but they can save your aquarium from disaster before you even knew you had a problem!
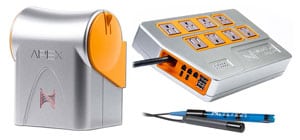
From controlling lights, pumps, and equipment to monitoring water parameters and letting you know if something is wrong, the Aquarium Controller is like having your own Full-Time Maintenance Technician looking after your aquarium!
Things To Be Aware Of
- You can buy base model packages and then add functions as you go
- Neptune Systems Apex is the industry leader and has many plug-in modules to make upgrading easy
- Just like dosers, aquarium controllers will do exactly what you tell them too. Bad Information = Bad Outcomes
- Most integrate into a smartphone app for real-time monitoring and control from anywhere in the world
- The sensors need calibrating regularly to remain accurate
- There are many forums dedicated to each individual aquarium controller
To find out much more about how much an aquarium controller could help you please have a read of my dedicated article:
Aquarium Controllers: All You Need To Know Right Here!
Beginners Tip:
Neptune Systems Apex range of aquarium controllers are by far the most popular. The number of add-on modules you can purchase for it is staggering and growing every month.
Because of their popularity, many aquarium equipment manufacturers are making products that are easily compatible with the Apex aquarium controllers.

By looking for this logo on products like lights, pumps, filtration, etc it will be instantly recognized by your Apex controller and will allow full control of that device through the smartphone app or web browser.
This allows you to monitor and control all your equipment from just one place with ease.
To Finish
No matter your budget there is a gadget to help you make a job easier or quicker. You may find that after a few months or years you end up with every one of these gadgets and you will wonder how you ever managed without them!
Rome was not built in a day and neither is your aquarium! Build your equipment up slowly over time and you will find that your time spent maintaining it will decrease, allowing you more time to spend with your family enjoying your piece of the ocean.
Further Reading
For more in-depth information on some of the items listed above be sure to check out some of our dedicated articles:
- What Is An Aquarium Auto Top Off?
- Aquarium WiFi Camera – Simple Setup For <$30
- What Is An Aquarium Dosing Pump?
- What Is An Aquarium Controller?
- Best Reef Tank LED’s – Your Guide For Softies, LPS & SPS