A leak on an aquarium can cause some serious damage if left unnoticed. By owning an aquarium you are going to get water on the floor at times, but the areas we need to pay attention to are the failures that can dump lots of water.
Having dealt with a few aquarium leaks of clients tanks I can tell you they are not fun and have cost serious amounts of money to clean up. This article has been written to try and bring awareness to the most common areas that can cause a leak or flood in your home.
Siphons, clogged pipes, and overflows and water left running are the biggest aquarium flood culprits. Good system design, foresight, knowledge, and the right products can not only help prevent aquarium leaks and floods but also shut off the water if a leak is detected.
This article talks about the following areas you should look into with your aquarium:
- Ways Your Aquarium Could Leak
- How to Prevent an Aquarium Leak or Flood
- Flood Damage Minimization
How Could An Aquarium Leak & Flood?
There are so many scenarios that can lead to a leak and flood. Many of them are preventable with a little bit of knowledge and foresight. Others, however, are just pure bad luck!
I’ve listed as many ways as I can to try and help bring awareness to you so that you can audit your aquarium system and see if any of these may lead you to wet socks!
1. Burst/Split Hose
PVC flexible hoses can split over time, especially if you have a hose under pressure and it is not designed to be. Warm ambient temperatures will allow the hose material to soften and the pressure can form a bulge and burst. Using braided PVC hose will help prevent this.

2. Failed Connector
Failed connectors and hose tails are another common area for leaks. If you have sideways forces applied to a connector, over time cause it to shear off. Always inspect your connectors regularly and replace if necessary.
3. Detached Hose
Properly secured flexible hoses are paramount. Many people will use plastic hose clips but I have seen these become brittle and fail over time.
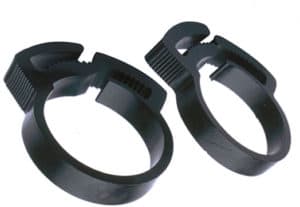
Other options are to use Metal hose clamps but these should be used with caution due to leaching metal and toxins into the water. Salt in the atmosphere will also corrode these. I do not advise their use.
The best method I have found is to use 2 plastic Zip-Ties around each connection. You can really tighten them up with pliers and they are solid forever.
I have never had a hose disconnect using this method.
4. Protein Skimmer Overflow
Protein Skimmers are one of the main filters in a saltwater aquarium but they can overflow from time to time and how you control the overflow is key. If you have an internal skimmer make sure the outside edges of the skimmer cup are within the walls of the sump. This way any water that overflows from the lid, falls into the sump and not over the outside of the sump.
If you have an external skimmer, have a drain hose that drains into the sump, a large collection container or the house drain. Ensure the drain hose can handle a large volume of water if the skimmer really goes nuts.
Have a Waste Collection System that will shut off the skimmer once it gets full, like this one from Reef Octopus:
You can find it Here at AquariumSpecialty.com for around $220.00

5. Blocked Drain
This one almost flooded my home! Every week be sure to check your overflows and drain lines coming from your display tank to your sump. I had Bubble Algae growing in my drain line and it was restricting flow.
I was lucky, I saw my water level was really high in my display tank when I was feeding my fish in the evening. If I had gone to bed I would have flooded.
A return pump supplying more water to your aquarium than can drain away will flood every time!
6. Siphon
A siphon occurs when water flows through a pipe and gravity allows this flow to continue, even after the pumping mechanism has shut off. Examples in the aquarium would be:
- Return pump shuts off and return nozzles that are below the water surface will allow the water to siphon until they meet air
- An Automatic Top-Off system shuts off but the freshwater reservoir is higher than the sump/aquarium. The water will continue to flow
Siphon breaks are required – More on these later…
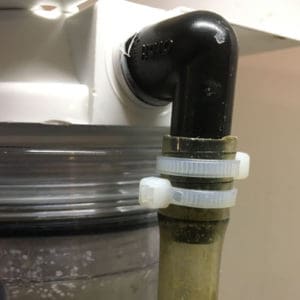
7. Failed Check Valve
Many aquarists install a Check or Non-Return Valve between their return pump and the aquarium above it. These prevent water siphoning back into the sump in the event of a power loss to the return pump.
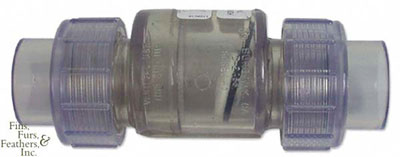
Without regular servicing, these can stick open and not shut when the water tries to flow backward. This can lead to an overflowing sump.
The clear valves with unions make it super easy to observe and maintain them!
You can find various sizes HERE at Amazon.com from $20.00
8. Cracked/Split Seam
I have seen a tank seam begin to split on a customer’s aquarium because of their use of a magnetic scraper with the razor blade attachment.
During their regular glass cleaning they had been running the razor blade too close to the silicone seam and one day part of the seam failed and the tank started to leak. Luckily we were able to get the aquarium emptied before a catastrophic failure of the seam occurred.
Keep razor blades and scrapers clear of seams! Use a toothbrush or algae scrubber!
9. Making Water
This is the number one cause of flooded homes with aquarium owners! RO/DI units create filtered water at such a slow rate and many people forget about it filling their storage container until they hear water splashing or the carpet becomes wet underfoot!
If you have an RO/DI water making system I seriously advise you to get a Flood Guardian from XP Aqua. It will save you so much hassle and its nicknamed ‘The Marriage Saver’ for a reason!!
For around $70 it is a no-brainer!! You can find more information and great reviews on the Flood Guardian
HERE at Amazon.com
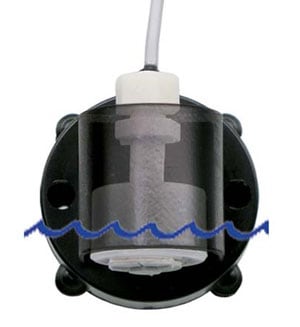
10. Float Valve Failure
This is rare but it can happen, especially if you do not give it a clean once in a while. Float valves are usually installed in sumps and water vessels to prevent the Automatic Top-Off or RO/DI systems from overfilling.
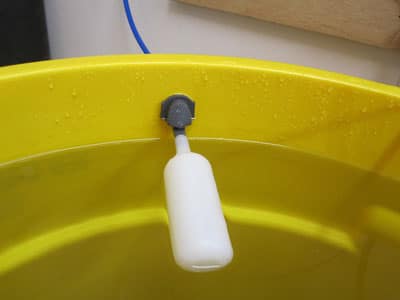
If the float switch gets salt creep, algae or debris stuck in the float, this can prevent the float from fully shutting and allow water to creep through. A brush with a toothbrush once in a while will keep this from happening.
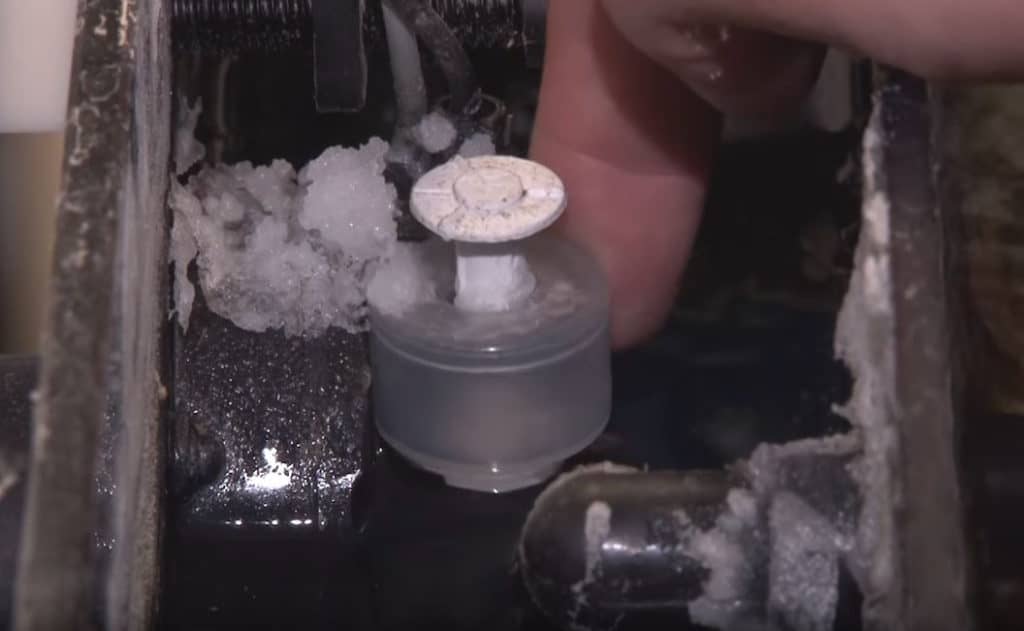
11. Stuck Sensor
Float switches/sensors are a great and simple way to provide a signal to an aquarium controller, auto top-off system or similar but they need to be used carefully.
Saltcreep, debris, and critters can prevent the float from rising or falling and shutting off the system it controls. I have had this on my float switches and after this, I clean them and give the floats a spin each week.
If your switches are in the same location as snails and crabs you need to guard them or put them in a tube or similar to prevent the critters from impeding their operation. A stuck float has flooded many homes!
Many manufacturers now use optical sensors to prevent a stuck switch.
12. Unsecured Powerhead
During your early days of being an aquarium owner, how many of you have had a powerhead stuck to the side of the aquarium using suction cups and at some point, the cups let go and either:
- Created and sandstorm in the aquarium
- Sprayed water in your face while cleaning the glass
- Sprayed water on your lights and destroyed them
- Sprayed water out of the aquarium and soaked the floor
I personally have had 3 of the above happen! And yes, my wife cried with laughter at one of them! Now I only use permanent or good magnetic mounts for any pump/powerhead I put in an aquarium.
13. Algae Buildup
Algae can be a real pain in the ass, especially when it begins to grow on or around our equipment. As I mentioned earlier, unseen Bubble Algae growing in my drain was a close call but algae can also impede the operation of float switches, optical sensors, block overflow teeth and redirect water flowing along spillways from HOB equipment.
Keep algae at bay with regular removal or cleaning.
14. Salt Creep
Salt Creep in an aquarium is an ongoing chore that needs to be completed by every saltwater aquarium owner. When water splashes it sits on a surface and evaporates, but it leaves the salt behind. When this salt dries it becomes a solid mass.
Salt creep can block siphon break holes, block pipes and overflows, impede float switch operations and even cause electrical short circuits. A quick re-wetting with clean RO/DI water and a scrub with a toothbrush will instantly clean it up.
15. Failed O-Rings
This is just one of those things that everyone has not much control over. Many pieces of equipment utilize O-rings to seal joining parts but over time these o-rings can break down.
O-rings for reactors, RO/DI units and pumps are readily available from stores and suppliers so every year I advise you inspect and replace the o-rings as necessary. They are usually only a few bucks each but could prevent a slow drip turning into a water spurt.
16. Burst Tank – Seam Failure or Impact
Catastrophic aquarium failure is one of those nightmares you hope never happens, but unfortunately, it does. A manufacturing defect you can never foresee but you should closely inspect your tank before ever getting it wet.
Look for bubbles in seams, chips, scratches, hair in silicone, anything that could be a starting point for a leak. Next, be sure the aquarium is installed flat and level on any stand. Rubber mats between the aquarium and stand can help take out microscopic unevenness, but a twisted or unlevel tank will put stress on seams over time.

The second major cause of tank bursts are impacts on the glass. Flying Kids toys and dog toys have been the cause of many broken glass panes with devastating effects! Keep the kids and pets under observation when around the aquarium!
17. Clogged Filter Sock/Floss
This one got me! When I first added my Frag Tank to the system I plumbed the drain from my display tank into my frag tank, then my frag tank drains into my sump, all under gravity.
On the drain from the display tank, I added a fine micron bag to prevent the bubbles from being spread around the frag tank. Well, this bag got clogged and the water poured out the top and over the side of my frag tank.
After that, I made sure the sock was cleaned every week!!! On my next frag tank, I will install a bubble trap to eliminate the sock, but this tank was too small to install one.
18. HOB Overflow – Failure To Start
HOB overflows can be one of the biggest PITA’s in the aquarium world and if you have one I really hope you are going to get a drilled tank next time!
These overflows are notorious for getting started, especially after a power failure. They work by starting a siphon then allowing the siphon principle to keep the water draining from the aquarium to the sump below.
In the sump, you have a return pump to move the water back to the aquarium. When the power comes back on, the return pump starts, but if the overflow siphon fails to start your tank will overflow.
I have seen it time and time again! I really advise anyone from buying these things!
How Can You Prevent Aquarium Leaks & Floods?
Now we have covered some of the ways your aquarium can get you shouted at by your spouse, we need to look at ways, products & insurance that can help you from getting an ear-bashing!
Awareness
This article is the main focus of this topic. By being aware of the areas that can cause the flood you can prevent 90% of the aquarium flooding incidents that occur daily across the globe.
Installation Design
This one covers many areas so we will go through each part as the design of your system, plumbing and installation will dictate if you will flood:
Design – Siphon Breaks
Earlier I mentioned how water will continue to flow after the pumping mechanism has stopped because of gravity. Siphons are really prone to a few main areas in our aquariums:
- Containers of fluid that are higher than the area they are being dosed to.
eg: An ATO reservoir that sits above the sump or dosing bottles that sit on a shelf above the water height in the sump/aquarium - Return Nozzles sitting under the water surface in the aquarium
- Durso style aquarium overflows
Any place where a hose/pipe is underwater and the other end of that pipe is lower than that body of water, it is a place for a siphon to occur. To prevent these siphons you need a ‘Siphon Break’.
A siphon break is a hole in the pipe that once becomes exposed to air, it breaks the siphon. Siphons only occur because the pipe is solid with water. Once air is introduced into the pipe it breaks the solid stream of fluid and the flow of water stops.
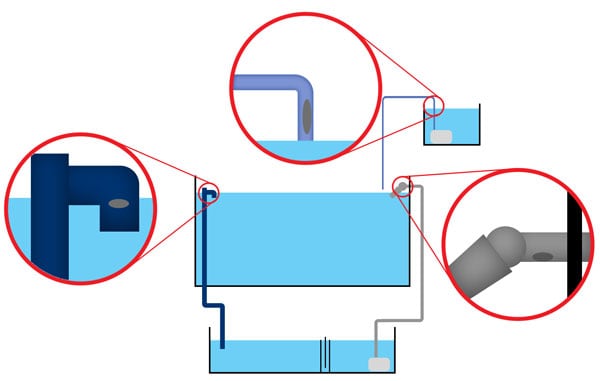
Siphon breaks can be below the waterline or above the waterline.
Above the waterline siphon breaks will never allow a siphon to start because it is able to immediately suck in air once the pumping mechanism stops.
This hole will, however, allow a jet of water to be shot out, but if the hole is drilled facing the water, it is no problem. This is how I have my ATO reservoir pump siphon break. I want it to stop immediately.
Below the waterline siphon breaks, will allow all the water above that hole to drain before the air reaches the hole and breaks the siphon. The lower the hole, the more water will drain before stopping.
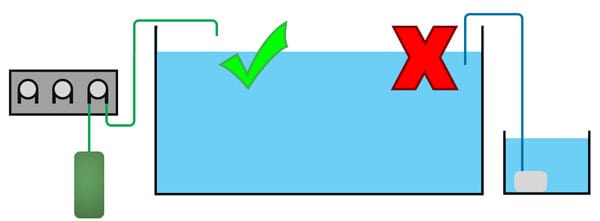
When using dosing bottles and dosing pumps it is always recommended to have the doser sit above the dosing bottles and the bottles be below the waterline of the sump or aquarium. This way supplements will never be able to accidentally siphon. Dosing units are fine to be located higher than the water level, just keep the bottles below the waterline.
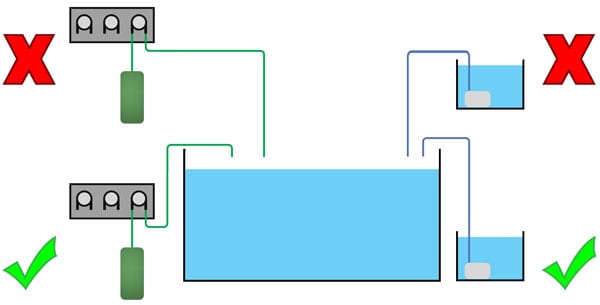
Always keep the pipes/hoses that deliver fluid to the aquarium or sump above the water level. Never submerge the ends, or water can flow from the sump/aquarium back to the lower container.
Design – Return Line Back Draining
If you have a sump below your aquarium you will need a return pump to send the water back up to it. When the power shuts off to that pump, the volume of water in that pipe is going to drain back down into your sump.
There are several things you need to design here:
- What is the height between the pump and return nozzle?
- What is the diameter of the return pipe?
- Do you want to install a check valve?
- Is your sump large enough to accommodate the return line water volume?
This is a fairly simple part of the design but if not done correctly can flood your sump. For most aquarists, it won’t be a problem because their sump is in the stand below the aquarium.
For aquarists like myself, my sump is in the basement and my return pump is 13ft below my return nozzles and my return line is 1″ diameter Schedule 40 PVC. I have roughly 1/2 gallon drain back into my sump when the pump stops.
If you place a check valve after your return pump to prevent this back draining, be sure to service the valve often so it closes when needed, but the best way to be sure you never leak is to set the water height in your sump.
Step 1 – When you first set up your sump, fill it with just enough water to cover the return pump.
Step 2 – Turn on the pump and continue adding water to ensure the pump stays submerged. Keep doing this until the water stays a constant height just above the pump.
Step 3 – Turn off the pump and take note of how much higher the water level in the sump rises. Let’s say it rose 4 ” with the pump off.
Step 4 – Now turn on your pump and fill your sump until the water is to your liking but is at least 5-6″ from the brim of the sump. This height is the Normal Running Waterline. Mark it with a sharpie for quick inspection.
Now when the power goes out your return line will drain but you will not overflow the sides of your sump.
Design – Overflow/Return Pump Sizing
Aquarium overflows and pipe diameters have a maximum flow they can handle. The bigger the overflow or pipe, the more water can flow through it. When you buy an aquarium with an overflow you will need to take note of the maximum flowrate for it.
Because of this limitation, you have to size your return pump accordingly. If your pump puts more water into the tank than can drain out of the tank it will overflow.
Eg: Your Overflow has a max flow rate of 1200 gallons per hour. If your sump is in the stand you have to ensure that the pump’s maximum flow rate at 5ft head pressure is below 1200 gallons per hour.
Pretty much all overflows are oversized because of this. If you run 1200 gallons per hour through your sump, your Protein Skimmer will be useless. They are only designed to run at around 200-400 gallons per hour and you should match your return pump flow to your skimmer.
For more information on sizing a return pump and protein skimmers, you can visit the links to my article on them at the bottom of the page.
Proper Installation Methods
Follow the manufacturer’s instructions when installing your piece of equipment. I have seen so many aquariums that are a time bomb waiting to go off because they have not followed even the simplest installation instructions. There are so many different ways to install your aquarium systems it can be difficult to find the right way.
As most men are egotistic, we know better right! Not all the time! If you are unsure of how the item should be installed go and seek guidance! Seek guidance from someone who knows too! Not just Wilson over the fence next door!
Leak Checking Outdoors
whenever you purchase a new aquarium, sump or fluid reservoir it is always a good idea to leak check them before installing them into your home.
A full leak check consists of you filling the entire container with water and leaving it for at least 24 hours. It is ALWAYS best to do this outdoors! You can just fill it with tap water. Just be sure to dry it out and wipe it all clean with RO/DI water before its first fill.
A fellow aquarist had just bought a used aquarium from the classified ads and proceeded to leak test it in his finished basement. Well, a seam let go and 50 gallons of water flooded his home! When asked why he didn’t test it outside he just replied that he was too excited and forgot! Luckily it was only freshwater!
Testing
When you first set up any full aquarium system or even a new piece of gear always make sure you are around in the hour’s post setup to ensure you can monitor it and make sure it works correctly and doesn’t leak. This includes going to bed!
Many O-rings have not sealed properly on reactors or vessels and a slow leak has been found only hours later, or if you have set up an Automatic Top-Off system, make sure it works properly and shuts off when it is supposed to. Never assume something is fine unless you have monitored it properly!
Timers
Timers are a great little device to help reduce the chances of a flood. The most popular place to put a timer is on your Automatic Top-Off System and allow it to only work for 1 hour in the morning and a few hours in the evening.
Allowing the timer to come on from 6am-7am will allow you time to spot any problems before you leave for the day. Having it also operates from 6pm-9pm will also allow you to spot any problems while you are home.
Most ATO systems are pretty much bulletproof nowadays but it’s just a way in which you can be doubly sure any malfunctions may be caught by you.
Solenoid Valves
Solenoid valves are a great way to help allow water to flow or not. A solenoid valve is a water valve that opens when a current is applied to it and closes when the power is shut off. This makes them a controllable valve and they are super easy to set up and use.
The best use I have for these little devices are on the water feed line to an RO/DI unit. They can be used to shut off the water supply when your water bowser is full, similar to the Marriage Saver seen earlier, or if linked to a flood sensor on an aquarium controller, it can shut off the water to the RO/DI unit if a leak is detected.
For $16 you can have a fully controllable water valve! The two items you need to make a DIY controllable valve are:-
12VDC Water Solenoid Valve
When buying a solenoid valve you want the plastic body type to be safe with saltwater.
You also want the N/C ( Normally Closed) type. This means the valve is closed until you put 12 volts to it, then it opens.
These are the type that I always use. They are super cheap and easy to connect to using wires with spade crimps and pushfit 1/4″ hose fittings!
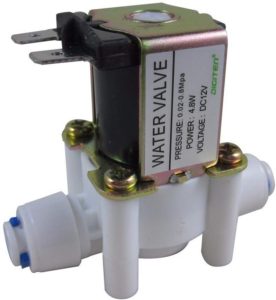
For more information, reviews and latest price Click Here to find it at Amazon.com
12VDC Power Adapter
The power supply is needed to drop the voltage from the wall to a safe 12 volts that can be used around saltwater. I don’t like using 110 volts around saltwater if I can and this is a great way to stay safe.
The main reason why I like this power adapter is you can screw in the wires from the crimps on the solenoid valve with the supplied adapter.
By then plugging this power adapter into a Plug-In timer you can control when it is on/off or by plugging this into an aquarium controller, you can have it be controlled that way.
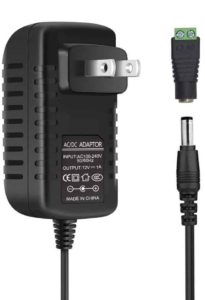
For more information, reviews and latest price Click Here to find it at Amazon.com
Another type of solenoid valve is one that mechanically closes the valve. This device is great for use on your home’s incoming water supply valve. This is the first time I have seen this valve manipulator and I’ve just ordered one for my own home! They are genius!
When used in conjunction with a smart water sensor If a leak is detected it sends a message to your phone and you can then activate the device to close the water supply to your whole house just with the click of a button on your phone!
You can purchase extra flood sensors and have an array of these all over your home monitoring areas where a flood could happen! Washing Machine, Dishwasher, Sump Pump, RO/DI unit, Hot Water tank etc. If any one of the sensors detects the leak it will shut off the water to your home and let you know!

For more information on the Automatic Valve Closer Click Here to see it to Amazon.com
For more information on the Smart Flood Sensors Click Here to see them at Amazon.com
Limited ATO Reservoir Size
A smaller Automatic Top-Off reservoir can do several things to your aquarium:
- Prevent a lot of freshwater being added to your aquarium in the event of an ATO unit malfunction
- Allows you to control when you fill the reservoir, and/or have a solenoid system fill the reservoir.
If you wish to connect the reservoir to an RO/DI unit using the solenoid system above and a float valve, you could set the timer to run from 5pm – 9pm. This way you are most likely to be home when its filling and you can easily check its working and the float valve shuts off every night when you do your aquarium inspection at feeding time.
A 5 gallon food-safe pail with a lid is a popular option. For information on how to check if your pail is food-safe, you can read my article ‘Saltwater Storage Containers – Not All Are Safe!‘
Servicing & Maintenance
If you have not realized by now, servicing and maintenance of your aquarium system and its equipment is paramount to not only a healthy ecosystem but also to spot any potential problems as they arise.
I have caught so many problems that were within hours of causing chaos during my Tuesday night maintenance. I feel I have pretty good knowledge of aquarium system design and upkeep, but I’ve been surprised at what a snail can do when it gets somewhere it shouldn’t!
Stay vigilant and you will stay dry!
Overflow Drain Pipes
A drain pipe is a drain pipe right! Yes and No. Most aquariums will be sitting in a living room, office or bedroom and two of the most important features we need from our aquarium installation are Silent Operation and No Floods!
The overflow and drain design on an aquarium is the part that covers these two requirements. Have you ever been to an aquarium store and you can hear slurping or gurgling noises? This is because of the type of drain system that has been used.
Drain Type is a complete article all by itself which is on my ‘To-Do’ list, but, there are three main types of overflow drain system used in most aquariums with a sump:
- Durso Drain
- Herbie Drain
- Bean-Animal Drain
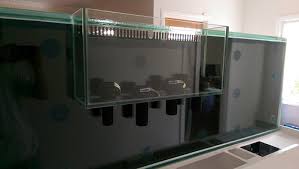
The reason I mention overflow drains is that Durso & Bean-Animal drain systems incorporate an emergency overflow pipe that will drain any excess water into the sump and prevent your aquarium from flooding due to a drain blockage.
My next aquarium will incorporate an external overflow box with a Bean-Animal Drain System similar to the one shown below.
Not Adjusting Then Leaving/Sleeping
I’ve left the most important one till last in the prevention methods because I’ve been close to tank crashes, floods and malfunctions because of this!
DO NOT ADJUST ANYTHING LAST MINUTE AND THEN LEAVE OR GO TO BED!
You may have even fallen victim to this yourself! Making water and forgot to shut off the water, doing maintenance and forgotten to turn on that piece of equipment. About to walk out the door on vacation and you ‘Just Tweak’ something and all hell breaks loose!
This does not only apply to floods but to everything related to your aquarium. If you ever touch something on your aquarium makes sure you are going to be around for at least the next hour and check on the system a few times before leaving to ensure you have not missed anything, forgot anything, done something stupid or even been distracted by a phone call etc.
This one piece of advice will save your ass at one time in the hobby! Trust me!
How Can You Minimize Aquarium Flood Damage?
Unfortunately, you have gotten wet socks and you have cleaned it up and are reading this article. Pity you didn’t find it before the leak! So how can dagame by minimized?
Leaks in a saltwater aquarium can become very costly real quick. Not only does the water ruin things easily, but once it dries you are left with the salt residue which can be near impossible to remove without major construction.
Time is the biggest factor in minimizing damage. The faster you can detect the flood and get the water cleaned up the less damage if any at all you could face.
Below are a few things that will you should always have on hand or be aspiring to get
1. Aquarium-Only Towels
Everyone has towels and getting hold of one to mop up water is easy, but trust me, if your protein skimmer dumps its stinky muck all over your floor and you grab the partner’s best towel off the laundry pile to mop it up, you will be sleeping on the couch!
Get a good supply of old towels that you can use for the Aquarium-Only. You can wash them by themselves and keep the house harmonious!
Not only has your ‘Stupid’ fish tank, that you spend all your time and money on just leaked stinky crap all over the floor, but the pure white towel now looks like your dog has been dragging it through the yard! You are going to hear about it!
2. Wet /Dry Shop Vac
If you have carpet where your aquarium is located a wet/dry shop vac is a must. getting as much of the water out of the carpet will save the carpet from becoming stinky over time. You can pick up a good one fairly cheap and any hardware store.
3. Fans
If you have carpet or wooden floors then after you have mopped up the water you need to get some air moving around the area to help dry out the water that has seeped underneath before it can swell the wood or allow mold to set in.
Blowers or high-powered fans are great for this, but any fan is better than nothing.
4. Tiled Floors
One of the best things you can do if you are about to set up an aquarium is to tile the floor where the aquarium will sit. Not only does this allow you to change the room flooring with ease, but it makes mopping up leaks a breeze!
I have moved several aquariums for clients because they wanted to change their floors and I can tell you it can take over 20 hours and having ti done and not losing at least some livestock is near impossible!
5. Floor Drain
If you are having the floor area tiled, see if you can install a floor drain in the middle of it. Do you have a basement or crawlspace underneath? This will save you so much hassle and give you peace of mind if your home will allow for it!
A drain for any aquarist is their best friend! If you are planning a fish room, then a floor drain is a must too! As well as a sink 😉
6. Gadgets
Flood detectors, Water level monitors and aquarium controllers all play their part. Some are super cheap and some are super expensive but they can all save your butt, it just depends on how much you want a gadget to save it!
Here is a simple water level monitor you could use when you make water for water changes. The amount of people who forget and flood their homes is unbelievable. The Marriage Saver is a great gadget, but if you are on a budget this monitor is a great alternative:

7. Aquarium Insurance
The final piece of the puzzle is insurance, especially if you rent your home of you have other people living below you. Not only can a leak cause you serious troubles, but you can then be sued by others who have had damage to their property.
I have an article dedicated purely to Aquarium Insurance that you can find here:
‘Aquarium Insurance – Are You Covered?‘
It explains all you need to know and how to get covered.
To Finish
To most of you, many of these things mentioned in this article may have seemed no brainers and obvious, and to some, they may have never been thought of before. The main idea behind this article is to make you aware of as many possible places that can cause a leak and ways to prevent them or minimize any possible damage caused by a leak.
I have dealt with some big saltwater floods in my time at clients and aquarists homes. They were ALL preventable and for some, the cleanup costs led into tens of thousands of dollars!
Take your time, carefully test and employ as many preventative methods as you can and you will be well on your way to keeping your feet dry!
Further Reading
To help you expand your knowledge on items I have mentioned in this article you can find a great selection by clicking the link below to take you to my Article Index Page:-
>> The Beginners Reef Article Index <<