Most living organisms are sensitive to sudden changes in their environment and any changes need to made gradually. Think about when you walk out of a lovely air-conditioned room and into 120°F of summer goodness. The sudden change makes you feel uncomfortable until you become accustomed to it.
Your fish are no different, except only a small change in just one water parameter could be enough to kill them.
Fish acclimation is a slow process of equalizing water parameters between two containers to prevent any sudden change from harming or killing the fish. The main two popular methods are Bag Floating and Drip Acclimation. Both are very easy to complete with great survival rates.
Moving fish from one water source to another is a simple but very necessary process and one that has been perfected over the decades by thousands and aquarists.
This article shows you step by step on how each method to ensure your new addition makes the move without a hitch!
Is Fish Acclimation Really Necessary?
Fish are susceptible to rapid changes in PH, Temperature, Salinity, Ammonia, and Nitrates to name just a few. When you purchase a new fish from an online supplier, local fish store or another aquarist, the chances of their water matching your aquarium water are slim.
Many fish stores like to keep the salinity level on their tanks a lot lower to help keep sickness and diseases spreading and wiping out their entire stock.
Your job as the new owner is to provide the most stress-free journey for the new fish into your aquarium. A move is always stressful and stress can bring out a hidden illness which can and does wipe out an entire established aquarium.
Any new purchase should ALWAYS be quarantined to protect your aquarium!
How Long Do You Acclimate Fish For?
Most acclimation takes place over a minimum of 30 minutes to one hour and should not be rushed. Patience will always pay dividends to your new purchase and it is an important step that needs to be done every time a fish moves habitat.
What Do You Need For Acclimating Fish?
No matter which method of acclimation you chose, the following items will be used for years. Oh and its better to get your own stuff rather than steal your partners! Trust me I got yelled at many times before getting my own!
- Scissors
- Plastic or Wooden Clothes Pegs/Pins – One for each transport bag
- Small Jug – Approx 1/2 cup or similar
- Fish Net – Sized to fit into the transport bag opening
Additional Items For Drip Method:
- Clean bucket or container to fit all fish being acclimated
- Airline Hose – 6ft
Steps Before Acclimating Your Fish
Like any process, there need to be a few things prepared before you begin the acclimation process. These simple steps are to help the move be as stress-free as possible for your new fish:
- Turn off the lights on the main display tank or your quarantine tank
- Dim the lights in the room where you will be unboxing the new fish
- Never have any bright light directly aimed into the transport box of your new fish ( Pot lights in the ceiling etc)
- Open one side of the transport box to allow a small amount of light to begin penetrating into the bags. Leave for 5 minutes
- Over the next 5-10 minutes slowly open the box to fully acclimate them to the light of the room
Now your fish are ready to begin one of the fluid acclimation processes, depending on their sensitivity.
What Are Popular Fish Acclimation Methods?
There are two tried and tested methods of acclimating not just fish, but these also work for acclimating invertebrates and corals. Each process depends on the sensitivity of the organism being moved.
- Bag Floating Method – Ideal for fish
- Drip Method – Ideal for Invertebrates & Coral
Bag Floating Method
- Get a clean cloth and a cup of aquarium water
- Use the aquarium water and cloth to give the transport bags a really good clean to remove any surface oils or dirt
- Rinse the outside of the bags with RO/DI water
- Keep the bag/s sealed and place them in the aquarium to float for 15 minutes. This allows the temperature of both bodies of water to equalize.
- After 15 minutes carefully cut open the transport bags, roll the top of the bag opening down like a sock approx 1″ and fix/peg them to the rim of the aquarium. This will prevent any of the transport water escaping into your display/QT tank
- Get a small jug and pour in approx 1/2 cup of your aquarium water into the transport bag
- Repeat this process every 5 minutes
- When the bag starts to become full use the jug to remove 50% of the transport bags water and dispose of it down the drain
- Repeat Steps 7 & 8 until you are past 30-50 minutes
- Test the water in the bag for temperature, Ph and Salinity. Once it matches your aquarium you can proceed to Step 11
- Use the net to remove the fish from the transport bag and slowly place the fish into the aquarium
- Carefully remove the transport bag from the aquarium and dispose of
NEVER ALLOW ANY WATER FROM THE TRANSPORT BAG TO ENTER YOUR AQUARIUM!
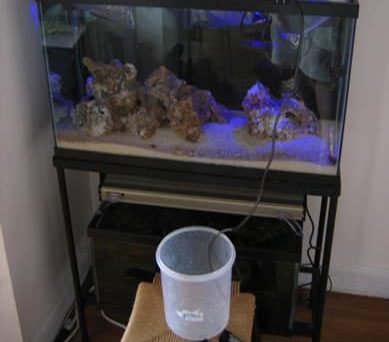
Drip Method – (This Is My Personally Preferred Method)
- Ensure the bucket or container is thoroughly washed and rinsed
- Place the bucket next to the aquarium
- Use the scissors to cut all the transport bags and empty all the water and fish from the transport bags into the bucket
- Make a note of the water height and find a level at double that height
- Use a clothes peg to secure the airline hose to the rim of your aquarium
- Tie a loose knot into the airline then suck on the hose end nearest the bucket to start the flow of water from the aquarium – Stop sucking before the water gets to your mouth! ;0)
- The tightness of the knot will set the drip rate. Aim for 2-4 drips per second – Looser the knot = Faster drip rate
- Allow the water height in the bucket to double, then remove half the water and dispose
- Repeat this step for 40-50 minutes
- Test the water in the bucket for temperature, Ph and Salinity. Once it matches your aquarium you can proceed to Step 11
- Use the net to remove the fish from the bucket and slowly place into the aquarium
- Dispose of the water in the bucket, rinse the bucket, dry and store for future use
What Do You Do After Acclimating New Fish?
Leave off the aquarium lights for the rest of the day if able. If unable, slowly bring up the lights to full intensity after a minimum of four hours after fish introduction.
I like to acclimate new fish in the early evening. This allows a longer period for the new fish to settle in before the next full day of light.
Keep an eye on your new introductions. Many established fish may begin to chase and terrorize your new additions.
When I introduced a Copperband Butterfly into my aquarium, the Yellow Tang harassed in constantly.
I taped a mirror to the side of the aquarium, then my Yellow Tang harassed itself for the next two days, giving my Butterfly a chance to get settled. After removing the mirror, the Yellow Tang was back to normal.
If you find an established fish is just not letting up and it looks like it is going to harass the new fish to death, then you need to isolate the aggressive fish. Never isolate to the new fish. This new fish needs to settle into the new tank.
You can buy an isolation cage that just drops into the aquarium and is full of slots to allow water to move through it. Place the older, established & aggressive fish into this for a couple of days to give it some ‘Time Out’.
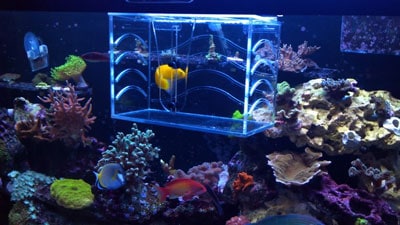
This one HERE at Amazon.com works great. Its the one I have used a few times in my own aquarium and the ‘Time Out’ usually works great.
Ensure your new additions are eating well and are not shying away from venturing out into the open space of the aquarium. Spot feeding new, shy fish with a turkey baster full of food may help them.
This is another reason why quarantine is so important. Having your new fish-eating and fattened up before entering the chaos of the main aquarium could be the difference of them surviving those first few weeks.
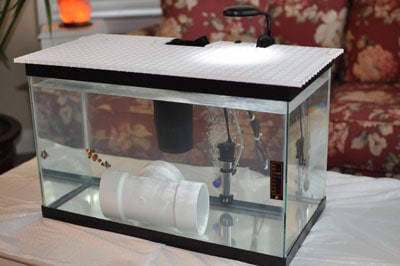
Is Fish Quarantine Needed?
Quarantine is the process of placing any new purchase or a sick/injured/harassed fish into a separate aquarium, away from your main tank, to allow them to either be medicated or inspected to ensure nothing passes into the main aquarium. 6 weeks is a typical quarantine period.
It is my strong recommendation that ALL new purchases should be quarantined. You can set up a simple quarantine tank for under $100 and it will save you from having to deal with an aggressive disease destroying years of hard work.
Acclimation needs to be done both going into quarantine and from quarantine to your main display tank. In fact, anytime you are moving a fish from one tank to another, you need to acclimate!
For a detailed article on how to set up a simple quarantine tank, you can read my article HERE…
To Finish
Acclimating your new fish is a simple process that does not take long. Once you have done it properly for the first time you will soon become a Pro.
Do not rush it and please, please get yourself a quarantine tank ready to go. I always medicate any new purchases no matter if they look healthy or not. You never know what parasites may be hiding inside them.
To date, I have never had any illness or disease in my aquarium and I can bet this is down to my quarantine and acclimation processes. Yes, I have lost a few fish during quarantine, but in my opinion, if they were not healthy enough to make it through quarantine, they were not ready for my main aquarium.