As aquarists, our job is not to maintain our fish but to in fact maintain water. By maintaining high-quality water, your aquarium will thrive. A good RO/DI water filtration system is where it all begins and this article is not only going to inform you all about the filter system itself but how to select one to match your setup.
RO/DI water filters are a modular filter system made up of sediment & carbon filters, a reverse osmosis membrane, and a resin of de-ionized beads to filter and polish any source water. Using this to filter all the water before it goes into your aquarium is the preferred way.
This article gives you all the information required to help you begin to select the best system for your home and aquarium.
Read on to see how…
If you wish to view some RO/DI Water Filter Systems to reference while reading this article, you can find a great selection of systems below:
What Is An RO/DI Water Filter?
I know you are wondering what the heck RO/DI stands for.
RO = Reverse Osmosis
DI = De-Ionisation
These two important processes are what will give you nothing (Hopefully) but pure H2O.
There are many RO/DI units on the market today and many of them range from 3 stages all the way up to 6 & 7 stages, so which one is right for you? Read on and find out all about it…
As an aquarist, you need access to clean water for your initial tank fill-up, ongoing water changes and daily topping off due to loss through evaporation. Most city and well water are full of chemicals, metals, salts, and dirt that will play havoc with your reef.
The RO/DI unit will filter out all of these contaminants to give you the best quality water, usually at 0 TDS (Total Dissolved Solids).
TDS is a measure of anything dissolved in your water except Hydrogen and Oxygen and 0 TDS is what we all want going into our aquarium ALL THE TIME!
What Are The Parts Of An Aquarium RO/DI Water Filter System?
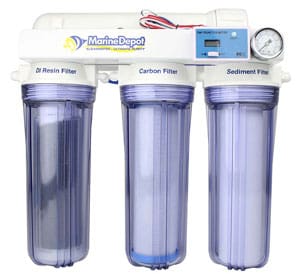
Sediment Filters:
These are used to trap large particles suspended in the water. Dirt, sand & debris all get caught in this filter. They come in a range of sizes ranging from 0.5 microns to 20 microns for use in our hobby. This is always Stage One on the filter system.
Carbon Block Filters:
These are used to remove scents, organic pollutants, heavy metals, pesticides and much more. These filters remove so many pollutants I would be here all day typing them out. They are by far one of the most efficient filters for getting clean water!
Reverse Osmosis Membrane Filters:
The heart of the filtration system. The filters used before this are there to help prolong the life of this fantastic membrane. This filter is a thin film composite, semi-permeable membrane that passes the water over it under pressure for the membrane to remove any leftover heavy metals, trace elements, and dissolved solids that the first 2 stages were unable to remove.
Osmosis works by water migrating from an area of low salinity to higher salinity, so Reverse Osmosis is the opposite. When the water migrates, it is forced under pressure through the membrane of the RO filter at which time many of the contaminants are captured, allowing only the water and a few contaminants to pass through it.
The membrane is very susceptible to Chlorine, hence why the Carbon Block filter/s before it.
The RO membrane housing always has 2 hoses coming from it:-
1. Clean, Purified Water – To be used in the aquarium.
2. Waste Water – This water is still good for feeding plants, washing cars etc. It is just more concentrated with the contaminants we do not want in our aquarium.
The biggest problem with the RO membrane is the amount of wastewater it produces. Most membranes produce wastewater at a ratio of 5 or 6 to 1. In other words, you will get 5 gallons of wastewater for every gallon of purified water.
There are some systems out there that seem to be getting better ratios and there are upgrade kits available to help reduce this wastage and those will be discussed later in the article.
De-Ionized Resin Filters:
The filters before this stage have been able to remove up to 99% of your water’s contaminants but we need 100%! This is where the DI-Resins come into play.
De-Ionized Resins are tiny beads that are electrically charged with either a positive or negative charge. The great things about these resins are that as they attract the remaining contaminants, they change color which makes it super simple to see when they need to be replaced. Placing these beads in a clear reactor makes this super easy!
There are 3 types of commonly used DI Resins:
Mixed Resin – This DI resin is a mix of both Cation and Anion resin beads. They are great for most aquarists and work well for removing the last 1-2% of contaminants left in the water. The mixed bed is generally used as the last stage of the filter system.
Cation Resin (+) – This filter resin is made of only Positively charged beads, therefore it attracts the negatively charged containments left in the water. Most commonly used as the first stage in a dual bed resin filter system.
Anion Resin (-) – This filter resin is made of only Negatively charged beads, therefore it attracts the positively charged contaminants left in the water. Most commonly used as the second stage in a dual bed resin filter system.
The de-ionized beads will need to be housed in a reusable cartridge to prevent them from being washed into the aquarium.
You can find the cartridges Here at Amazon.com
Pressure Gauge:
For the RO membrane to work efficiently it needs a minimum amount of water pressure to help push the water through it. The only way to see what pressure your city or well is at is to install a pressure gauge in the line coming directly from the faucet or house pipework.
Most RO membranes require a pressure of 40psi to 80psi to work at their maximum efficiency and if you are unable to meet that pressure you may have to install a pressure boosting pump.
Each membrane will have a label/instructions showing its optimum working pressure.
Find the Pressure Gauge Here at Amazon.com
Membrane Flush Kit:
It is recommended to flush your RO membrane for 5 minutes before and after using it to remove any waste that may have accumulated in the film.
When your RO/DI Kit arrives, it will contain a flow restrictor device that goes onto the ‘Waste Water’ line from your RO membrane. This device is what helps build the pressure in the membrane to help it work efficiently.
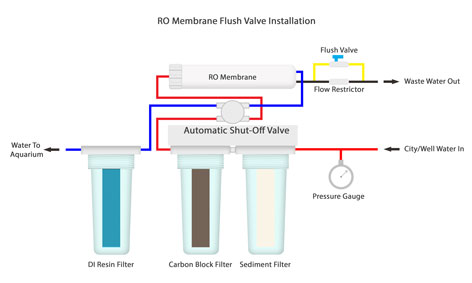
The Membrane Flush Kit bypasses this restrictor and allows full faucet pressure to run through the membrane flushing out the accumulated matter. This is just a valve that you turn on for 5 minutes, then turn back off.
This kit dramatically increases the life of your RO membrane and is highly recommended.
You can find the flush kit to match your Gallons Per Day requirement Here at Amazon.com
TDS Meter:
This little device comes in three types:
Single Meter – Has one sensor to monitor the TDS coming out of the RO membrane.
Dual Meter – Has two sensors. One to monitor the output of the RO membrane/DI Resin, and one to monitor the incoming TDS from the street/well.
Triple Meter – Has three sensors. One to monitor the output of the RO membrane, one to monitor the output of the DI Resin, and one to monitor the incoming TDS from the street/well.

The Dual Meter is my recommendation and is the one I use. I like to see the TDS coming into the filter system and the TDS leaving the filter systems to ensure it is working efficiently.
Once you begin to get more than 15 TDS coming from your RO membrane it is time to replace it.
You Can find the TDS Meter Here at Amazon.com
Pressure Boost Pump:
This is a must if your pressure gauge is showing your city or well pressure less than 40 – 50psi. As explained earlier, your membrane needs a minimum pressure to function efficiently. If you do not have this you will create lots more wastewater and your membrane will have a much shorter service life.
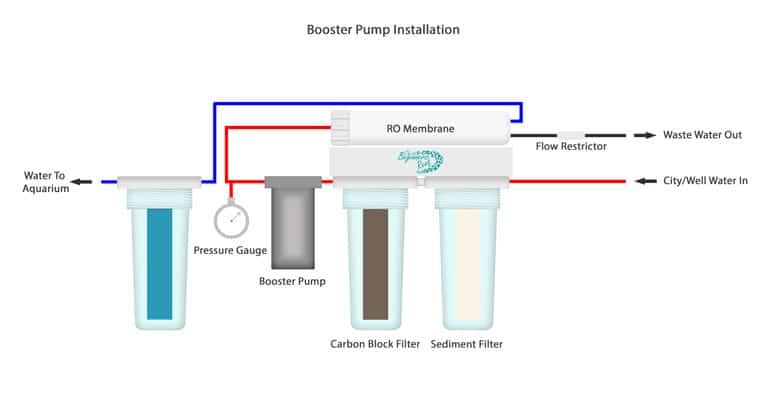
A Boost Pump is easy to install and really are worth their money. RO membranes are expensive and a boost pump will pay for itself in a few years of use.
You can find the boost pumps below at Amazon.com:
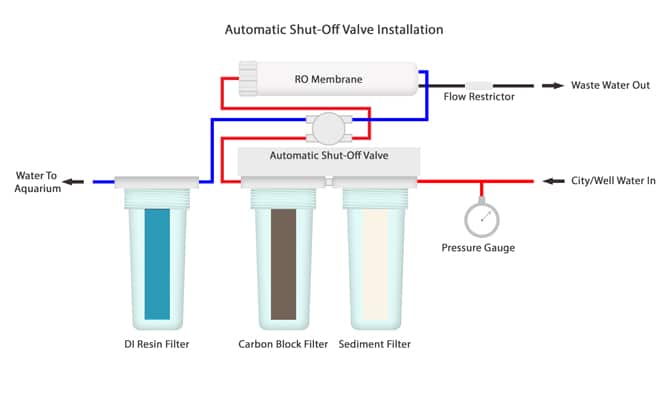
Automatic Shut-Off Valve:
This is mainly used when you want to use a ‘Float Valve’ to shut off the RO/DI water to your container, once it is full. These devices are great to have and WILL prevent you from forgetting and overflowing your container and flooding the floor. Yes, it happens a lot in our hobby!
Once the float valve shuts the pressure builds up in the filter and the Automatic Shut-Off valve sense this and shuts off the flow to the membrane. This prevents the membrane from sitting under constant pressure when it’s not in use. Again this helps to prolong the life of the RO membrane.
You Can find the Automatic Shut-Off Valve Here at Amazon.com
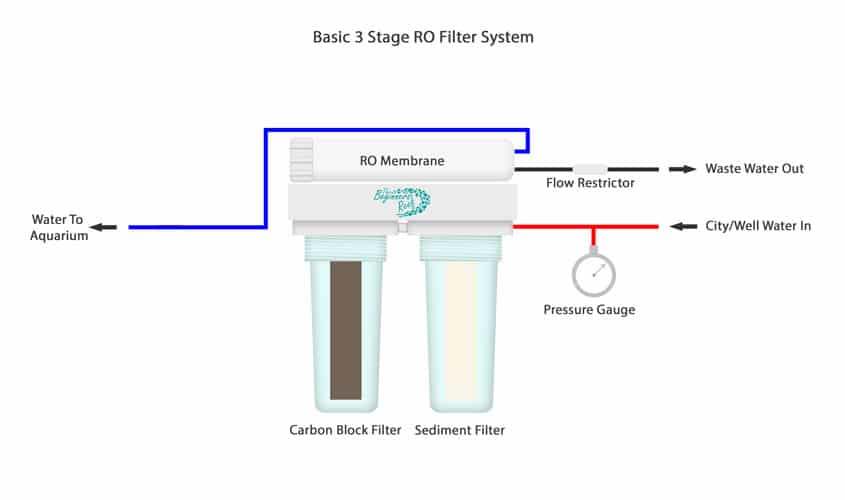
The Most Basic 3 Stage RO Only System:
The 3 stage system forms the foundation for all the larger stage systems and consists of:
Stage 1:
The first filter that your city/well water meets is a Sediment filter. This is used to trap the larger particles suspended within the water before transferring the water to the next stage. The usual filter size for this stage is 5 microns.
Most Sediment filters will need to be replaced every 6-8 months. They begin as pristine white and will turn a yellow/brown as they become clogged.
Stage 2:
The second stage is a Carbon Block filter. This is a filter made of activated carbon and is used to strip the water of heavy metals, organic pollutants, Chlorine and Chloramines.
Most Carbon Block filters will need to be replaced every 6-8 months.
These two stages are mainly to prepare the water to go through the RO filter. By providing this pre-filtering it prolongs the life of your RO filter which in essence is the heart (and most expensive) part of the whole filter system.
Stage 3:
The final stage of the Basic 3 Stage Filter is the RO (Reverse Osmosis) membrane.
Most RO membranes will need to be replaced after 12-24 months of use depending on how much its filtered, how many stages you have before it etc. A TDS meter will help you to see when this time comes.
The Most Popular 4 Stage RO/DI System:
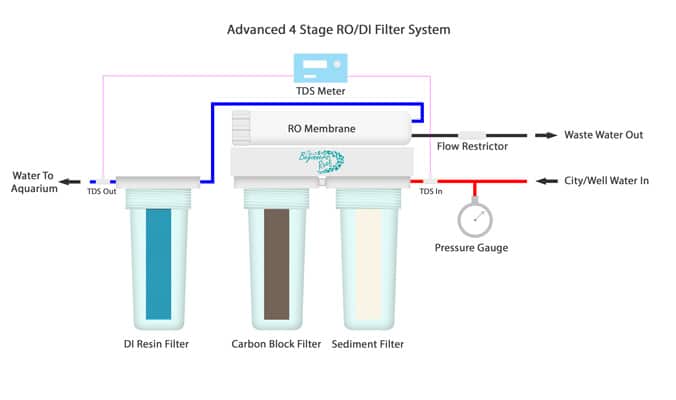
This is the 3 stage system but with an added filter stage, the DI or De-Ionised Resin. The water coming out from your RO membrane is good, but it may not be completely clean, The DI resin is here to completely strip any remaining contaminants from the water and give you pure H2O.
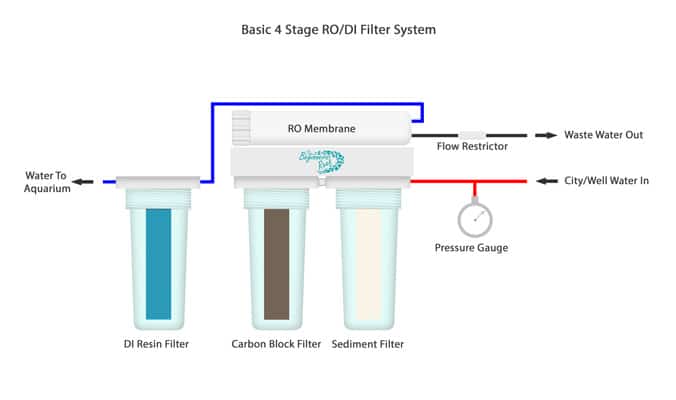
The DI Mixed Resin is made up of tiny beads that are either positively and negatively charged. Each type of bead attracts contaminants on an ion level using its charge. By having a mix of both charges it captures any waste left coming from the RO membrane.
This setup will provide you with 0 TDS water and is the benchmark system for most aquarists. This is the system that I personally own, with all the extras except the boost pump, as my city pressure is high enough.
Why Are There 5, 6 & 7 Stage RO/DI Filter Systems Available?
This all comes down do how many ‘Nasties’ you have in your water supply. So many cities and well’s are full of contaminants and a 4 stage system can get used up very quickly. The extra stages are added to help deal with the increased level of certain contaminants.
If you suspect you have a lot of contaminants you should look at getting your supply water tested and see what it contains. This will give you a good idea of which extra stages to add. Many towns will have a service for testing water free of charge or for a small fee. Contact your local water department to see what they offer.
Another option is the companies that supply drinking water fountains to businesses. They will have an RO/DI unit on steroids, but they will have had to tailor it to suit the incoming water supply. A quick call or visit to them may give you an insight into what you may need.
A word of caution though, they WILL try and sell you one of their systems! Do your research and check for pricing on similar filtration systems as the type offered by these stores are usually way overpriced!
For Example:
If you have well water that is full of suspended solids you could have 2 sediment filters. The first a larger 5 micron sediment filter and the second a 1 micron sediment filter. This would be a 5 stage system with 2 of those stages aimed at sediment.
or
If you have city water that is high in Phosphates, Silicates or Nitrates, for example, you could use 2 Carbon Block Filters to help clear the elements before sending the water to the RO membrane.
When you start getting to the 6 and 7 stage filters your incoming water source is absolutely full of contaminants and need some serious processing to get your water pristine.
A Typical 6 & 7 Stage system is good if you have high levels of:-
Ammonia
Carbon Dioxide
Phosphate
Chlorine
Chloramine
A 6 Stage System will consist of:-
1 One Micron Sediment Filter
2 One Micron Carbon Block Filters
1 RO Membrane
2 DI Mixed Resin Filters
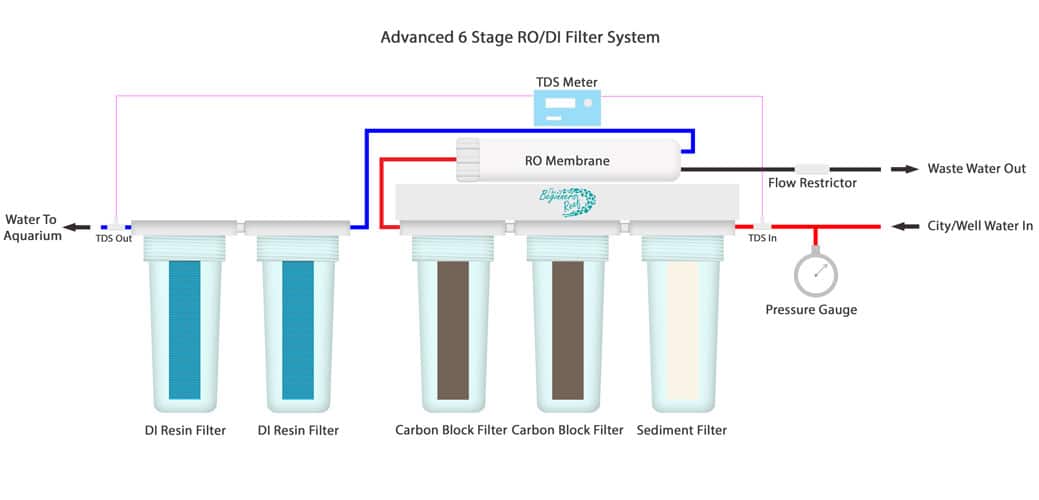
If you find you are burning through the Mixed DI Resin filters too much, you could look at getting an extra stage and splitting the DI Resins into their own charged reactors with a Mixed DI Resin for a final polish.
A typical 7 Stage System will consist of:
1 One Micron Sediment Filter
2 One Micron Carbon Block Filters
1 RO Membrane
1 DI Cation Resin Filter (+)
1 DI Anion Resin Filter (-)
1 DI Mixed Resin Filter (+ & –)
Keep Reading to See Exactly How I Would Set Up A RO/DI Water Filter System
How To Select An RO/DI System That Is Right For Your Aquarium?
- Have your water tested or see what other local aquarium owners are using
- Decide on how many stages you think you will need based on Step 1
- Research the different types of systems available and narrow down which you think will be right for you
- Start with the least amount of stages you think you will need, but leave space to add further stages if needs be in the future
- Is your filter system going to be permanently installed or portable? (More on that later)
- Look at flooding prevention products – Trust me it will save your behind!
RO/DI Installation: Permanent vs Portable
Most RO/DI water filtration units come with the filter canisters mounted to a bracket. This bracket is then secured, usually to a wall, near a sink. Your RO/DI unit will need to access the water supply in your home and also a drain of some sort for the wastewater.
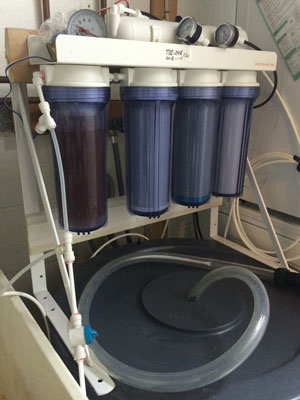
This is how I have my 4 stage installed:
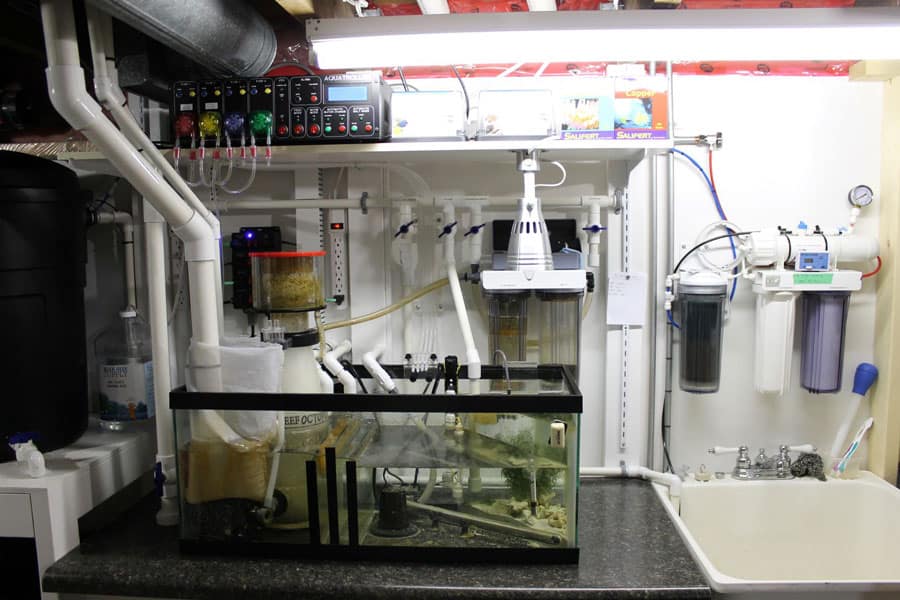
Most aquarists permanently install their RO/DI unit on the wall or under the sink in the cabinet to keep the unit neat and tidy. This is the best solution, but what if you rent a property or you have nowhere to physically install the unit? What about if you have nowhere to locate a water container such as a Brute trashcan for your water while you fill it?
Many of the locations you could find in your home to make and store water are very rarely next to a water source so what do you do?
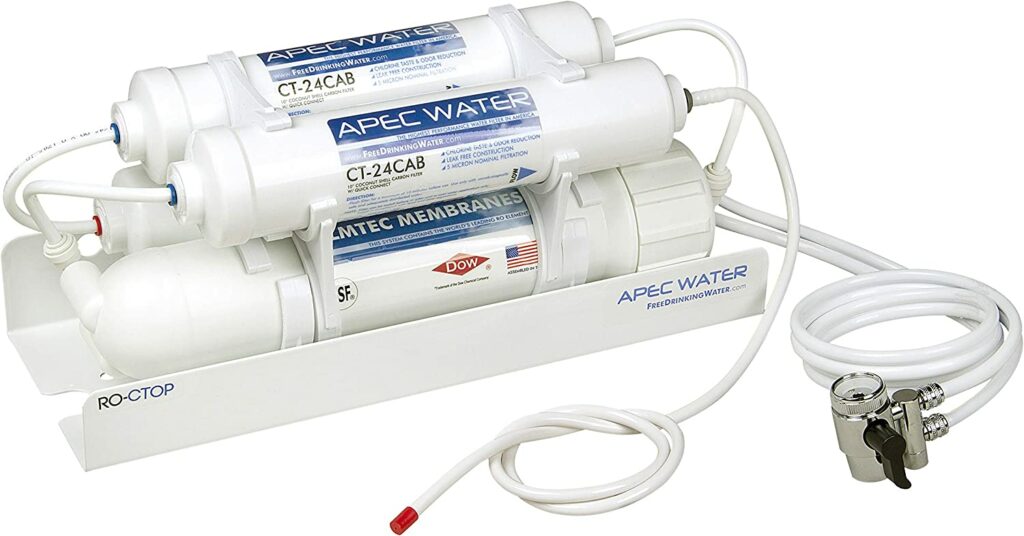
The answer is to have a portable stand or frame to mount your RO/DI unit to and then you can bring out the unit when you need to make water, then put away out of sight again.
Another alternative if you are handy is a DIY Stand. You can see a simple DIY stand made from 2 shelf brackets and some pieces of wood:
Having a stand will make it easy for you to bring the unit out into the bathroom, for instance, connect the RO/DI unit to the house water using a faucet adapter and the place the drain hose into the bathtub. Now you can leave your unit to run and make water.
Beware of flooding your home though whenever you make water! Every month I hear through the many social channels and forums I follow of people forgetting and flooding. You will not be the first and certainly not the last person to flood if you don’t take a few precautions to prevent it.
Another thing to consider when looking to install your RO/DI filtration system is the amount of time it will take to fill your water vessel. Most of the popular units run at either 75 or 150 gallons per day and trust me, it seems to take forever! Most units take anywhere from 45 min to 1.5 hours to fill a 5 gallon bucket.
It could take you half the day to fill a 30 gallon Brute Trashcan, so is your partner going to let you take up the bathroom for the whole day? Probably not.
If you are setting up a large aquarium (+100 gallons), it is going to take a long time to fill it and to make enough water each time you wish to do a water change. Having a location, out of the way where you can leave your unit running and filling will take some thought and planning, but it is something you will need to consider.
There are upgrades you can purchase to help speed up the water filtration and those will be discussed later.
Plumbing Connections
There are various methods you can use to plumb in your new RO/DI unit and they all depend on:-
- Can you do your own plumbing?
- Do you need to call in a plumber?
- Is your RO/DI unit permanent or portable?
If you can do your own plumbing or have a plumber then this section is not really needed for you as you/they will know what to do, but if you don’t have those luxuries, there are some simple installation methods:
Permanent Installation Without A Plumber Needed:
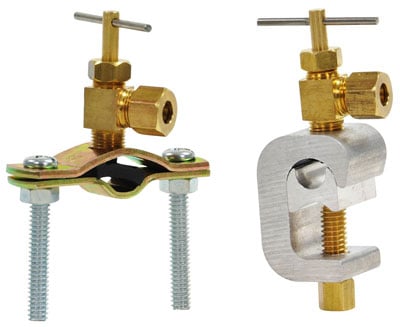
You will need a Supply Valve and a Drain Saddle:
Supply Valves are for your COLD WATER home water connection and they generally come in two types:-
- Fixing to a rigid copper/plastic water pipe
- Fixing to a braided hose water pipe.
Rigid Pipe:
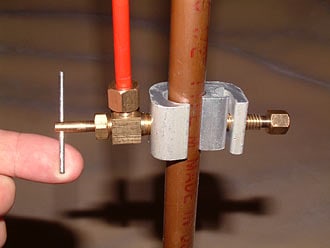
The rigid pipe supply valves clamp around the pipe then you screw in a piercing needle which punctures a hole in the pipe. You wind the needle back out and then water can flow to your RO/DI unit. Super easy to install!
Braided Pipe:
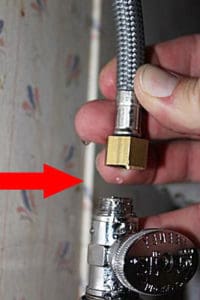
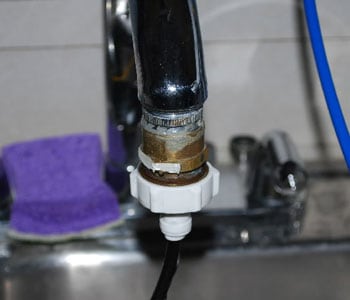
You cant use the piercing supply valves on flexible and braided hoses so the alternative is the adapter. You unscrew the braided hose from the COLD WATER valve under your sink, insert the adapter, then fit the braided hose onto the adapter. Again, super easy to install.
Portable and Non-Permanent Installations:
Garden Hose Adapters:
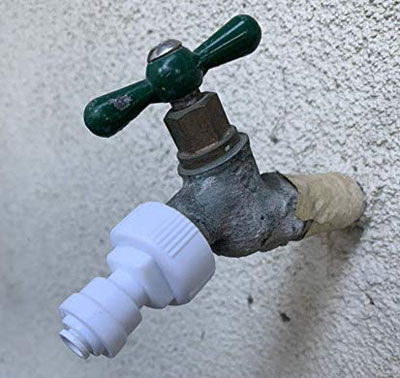
These are great for when you are using a portable RO/DI unit. These adapters screw onto your faucet that has threads on the outside of the spout, you can connect your input hose to them, then run the hose to your RO/DI unit.
Faucet Adapters:
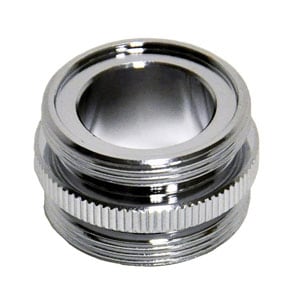
The same principle as the garden hose adapter, but these are to fit your faucets with threads on the inside of the spout. Most kitchen/bathroom faucets have a screen in the outlet of the faucet which you can unscrew, fit the adapter and then connect on the above garden hose adapter.
Drain Saddle:
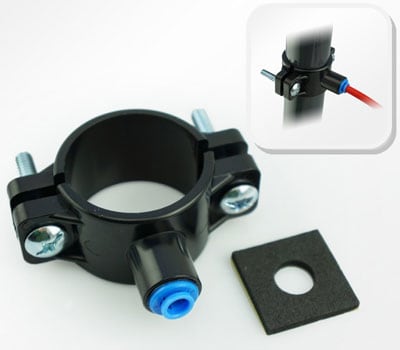
This is used to permanently connect your RO/DI wastewater line to your sink/home’s drain plumbing. All you need to do is drill a 1/4″ hole in one side of the drain pipe, then install this with the hole lining up with the tubing connector.
If your RO/DI unit is portable, just secure your wastewater pipe down the drain hole in your sink or bathtub while you are making water. Just be sure it cannot pop out!
Keep Reading to See Exactly How I Would Set Up A RO/DI Water Filter System
How Do You Prevent Aquarium RO/DI Filters From Flooding?
Flooding happens all the time when making water and even the most conscientious aquarist can get distracted and have the container overflow. Here are some great ways to help prevent or minimize the chances of you walking in and getting a wet sock!
The Flood Guardian (AKA: The Marriage Saver):
The video says it all and for 70 bucks, it’s worth all the nagging you will get off your partner when you have just ruined your hardwood floor!
You can see more on this unit from Here at Amazon.com
Float Valve:
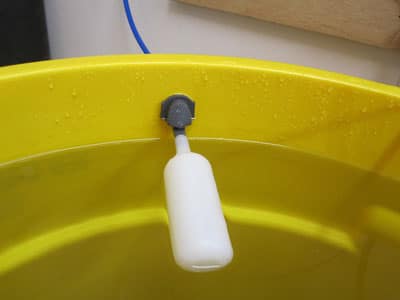
This is one of the best lower priced items you can buy. It will automatically shut off the water once it reaches the height of the float valve.
You have to drill a hole and permanently fix the valve to the container and all you do is connect the pipe from your RO/DI unit and leave it to fill.
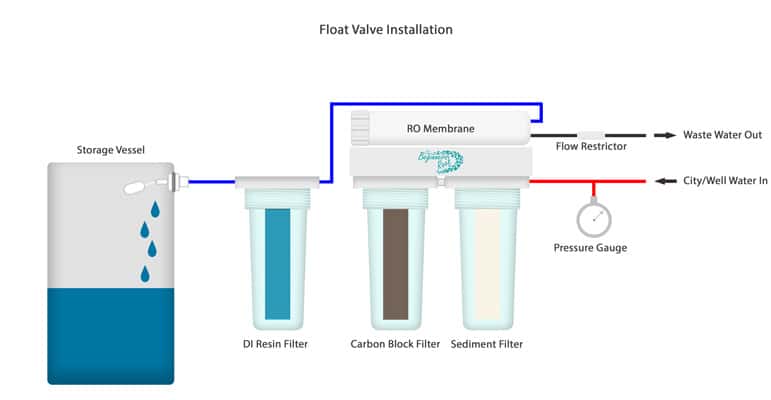
They work on the same principle as the float valve in your toilet. When the container is empty, the float on the valve falls down due to gravity. As the water rises, the float will begin to rise on the top of the water until it fully closes the valve. At this point, the water stops flowing. No flood!
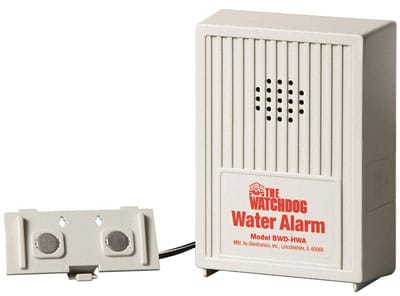
Flood Alarm:
This device has a water sensor that detects water and sounds an alarm. You could use this in two ways:
1. Place the unit on the floor and when it screams at you, the floor is wet 😉
2. Remove the sensor part of the alarm and hang it near the top of the water collection vessel. When the water is nearing the top, the alarm goes off!
You can find out more on this cheap device HERE at Amazon.com
or
You can find alarms that connect to your Cell Phone HERE, also at Amazon.com
Alarm On Your Cell Phone:
We all have a cell phone and why not set an alarm to remind you to turn off the RO/DI unit. Time how long it takes you to fill your water collection vessel then next time set your alarm to go off 5-10 minutes earlier to remind you to shut it off.
Just don’t go out and forget because 10-15 minutes after your alarm goes off your floor might be getting wet!
Container In The Bathtub:
This one is simple. Who cares if it floods if you have your container placed in the bathtub! Just make sure you can physically lift your container out when it’s full. Even a 5 gallon pail is going to weigh close to 50lbs when it’s full!
Overflow Drain On The Container:
If you have your system set up in a permanent location and your RO/DI is plumbed into the drain, why not plumb in an overflow drain into your collection vessel. A hose connector fitted near the top of the water collection container that runs to the drain will ensure you will never flood the floor.
Hose Clamps:
You would not believe how many people have flooded their home because they did not properly secure their hoses! The hose going into the drain and the hose going into the collection vessel MUST be tightly secured.
Hoses can slowly move over hours of use and if they become dislodged from where they were meant to be you can get a lot of water discharged before you realize! Get them clamped!!!
Another thing you might want to look into is insurance if you flood your home or rented property, especially if you live above someone. Floods can be VERY costly and you need to make sure your rear-end is covered!
Have a read of my article on Insurance for Aquariums.
Upgrades To An RO/DI Aquarium Water Filter
At first, you will most likely want to get your RO/DI system up and running. Setting up a saltwater aquarium is not cheap and somethings you really need to spend your money on. There are a few things with an RO/DI unit that you can purchase in the future that can really work wonders for you.
Water Saver Kit:
The one downside to RO/DI filters is the amount of wastewater they produce and luckily there is a way in which we can reduce this ratio!
We should all do our part to not waste any water on our planet and making RO/DI is no excuse.
The answer to this is the Water Saver Upgrade Kit from Amazon.com.
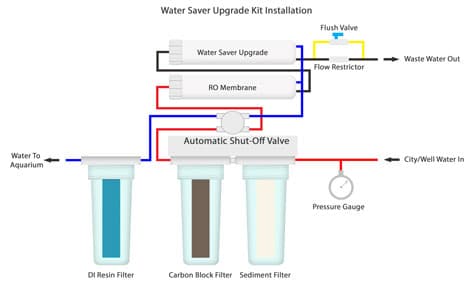
This is an additional RO membrane that hooks up to the ‘Waste Line’ of your first RO membrane and the second membrane filters that waste into filtered water. You have now just halved your wastewater production in one go!
Drinking Water/Fridge Add-On
Having a really good water filter for your aquarium is great, but why let your liquid friends get all the good stuff? If your RO/DI unit is fairly close to your kitchen, or underneath in the basement, why not send some good water up to your fridge or to a new faucet on the sink?
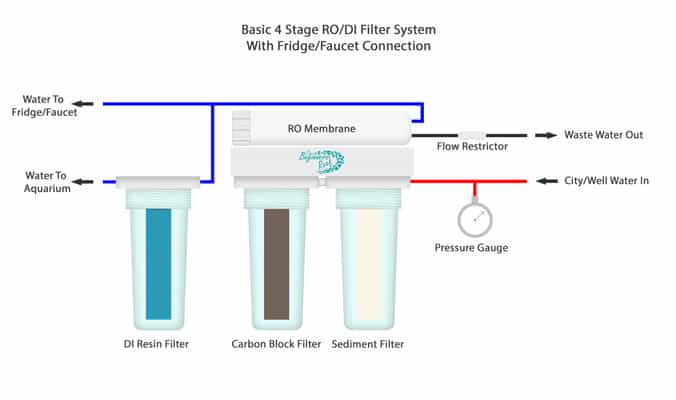
By tapping off the RO water before it goes into the DI resin you can add a simple ‘Drinking Water’ kit that can feed both the fridge and a new faucet. These kits are super cheap and give your whole family access to clean, filtered drinking water.
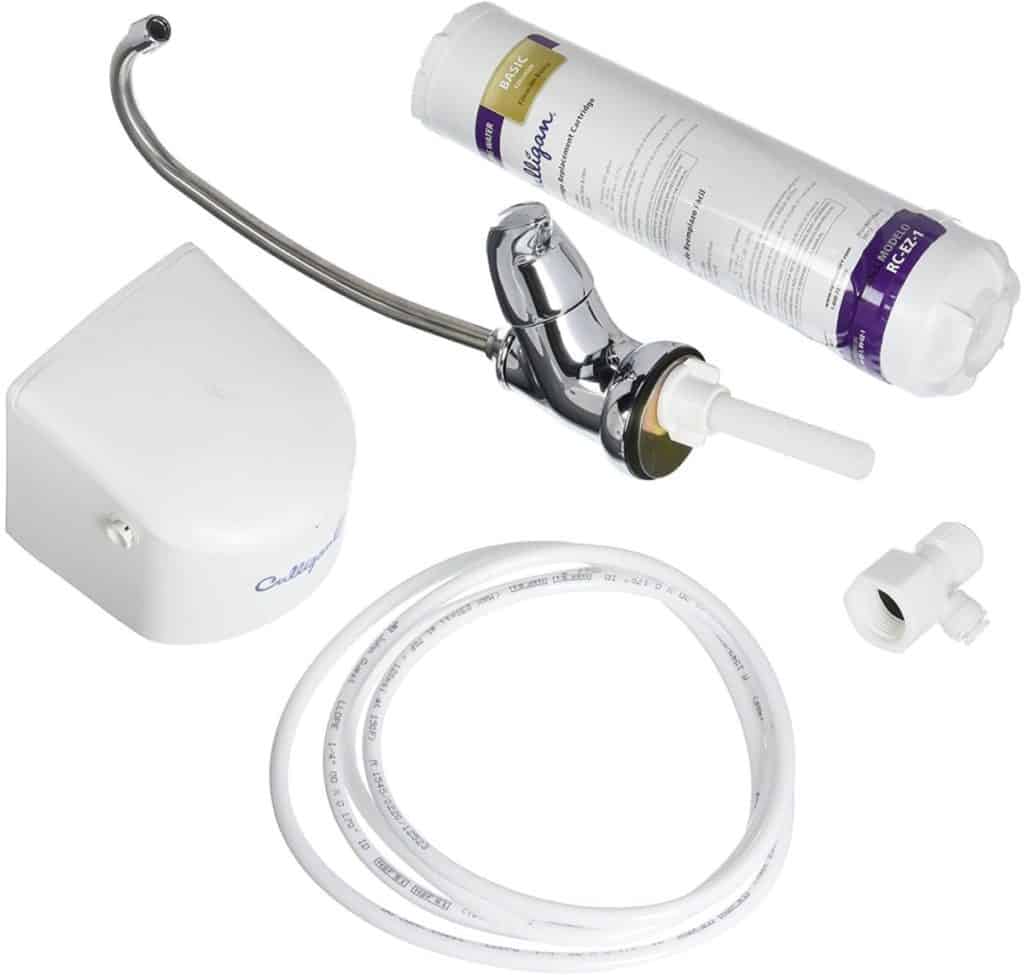
When installing a drinking water upgrade kit it is important to make sure you tap off before the DI resin as stripping the water totally of its minerals and salts can actually harm the body. When pure H2O is ingested into the body it can cause the salts and minerals to be absorbed out of the stomach cell walls causing what is known as ‘Osmotic Shock’.
You can find this Faucet Addon kit Here at Amazon.com
How I Would Setup An RO/DI Water Filter System…
I know this can seem like a daunting thing to set up but it really is a lot simpler than you think and your livestock will greatly appreciate it and reward you with a thriving tank! These are the components I would get if I were to set up a new water filter myself:
Three-Stage RO/DI filter housing comprising of the following filter media:
1x One or Five Micron Sediment Filter
1x One or Five Micron Carbon Block Filter
1x RO Membrane
1x DI Mixed Resin media stored in a Reusable Cartridge
1x Add-On Filter Housing for DI Resin cartridge
1x Water Saver Kit
1x Flush Kit
1x Pressure Gauge
1x Pressure Boost Pump (If required)
1x Automatic Shutoff Valve
1x Vessel Float Valve
1x Rigid Pipe Connector
1x Drain Saddle
1x TDS Meter
You can find alternate or replacement filter cartridges Here at Amazon.com
You can shop around and find all these separately or some of them come as a pre-assembled bundle like THIS ONE at Amazon.com. To complete this setup you would also need the following:
1x DI Mixed Resin Filter – Replace the last carbon filter with DI Mixed Resin media & Cartridge
1x Pressure Boost Pump (If required)
1x Drain Saddle
1x TDS Meter
You will have to adjust your filter media sections to suit your local water conditions but this is exactly how I would have mine. My current setup is missing the water upgrade kit but that is on order and will help to reduce my waste water volume:
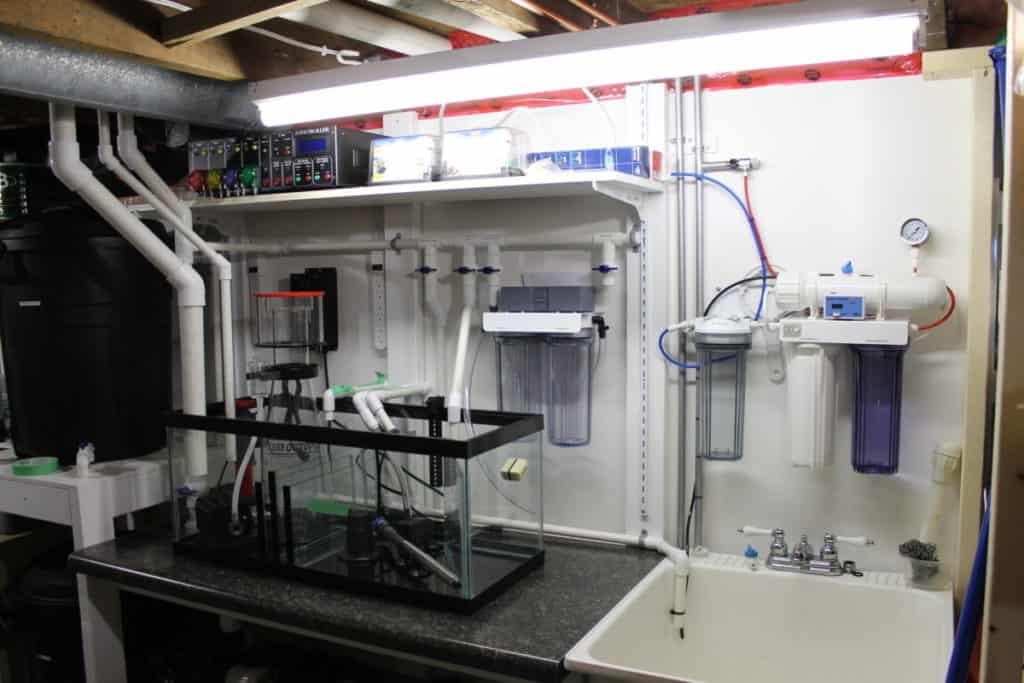
Here you can see my 4 stage filter system with my Freshwater collection bin in the far left of the photo. Use the installation diagrams you see in this article to help you connect all the components to suit your system.
RO/DI filter installations only require a few basic handtools but there are a few extra supplies you may need that will help. All links to Amazon.com:
- RO Pipe Cutter – Needed for perfect cuts
- 1/4″ RO Water Pipe – For extending pipes – Using Colors helps differentiate during installation
- 1/4″ Quick Connect Fittings – Makes for easy installation
- Teflon Tape – For use on threaded connectors
- Zip-Ties – For keeping pipes neat
- Zip-Ties Bases – For securing pipes to surfaces
- Filter Wrench – Just in case you break yours!
- Filter O-Rings – Just in case one breaks
To Finish
The RO/DI water filtration is one of the best purchases you will ever make for your aquarium. By having, your water tested you can speak to the pros and get a setup tailored to perfectly filter your water with minimal cost and wastage.
Installing it permanently or portable, you will not regret the few hundred dollars you spent to ensure your aquarium inhabitants have the cleanest environment to live in.

